If you make trap beats, you probably find yourself mixing trap samples on the regular.
But any time you add samples to your track, you’re adding a recorded element that has completely unique characteristics that could affect the quality of your overall mix.
For starters, one sample might have been recorded with a lot of low-end at a very high-fidelity, while another sample might be lo-fi with a lot of high-end.
Luckily, you just need to know a few basic tips for mixing trap to get your samples sounding good together.
In this article, we’ve teamed up with APEX audio—one of LANDR’s premier sample labels—to dive into the basics of mixing trap samples.
Plus, we’ve got a free collection of great APEX samples to try these techniques for mixing trap.
Let’s dive in!
1. Select some trap samples
Any time you add samples to your track, you’re adding a recorded element that has completely unique characteristics.
For this tutorial, we will use some samples from our ‘Apex – Lemonade‘ pack to make a trap beat.
We’ve selected a few loops of the ‘sunlight’ beat from lemonade and some drums we liked.
If you want to follow the tutorial closely, feel free to pick any trap samples from this free sample pack from APEX.
But really, a full drum loop, 808 loop, rimshot loop, a pad or melody loop will work.
It could even be a horde of crickets sampled in the wild savannah, we won’t judge!
Drop those samples in and let’s start mixing!

After you drag the samples in, lower the volume per stem so you’re not red-lining your DAW and distorting your beat.
@landrmusicThe easiest fix for the most common mistake 😤. ##musicproducer ##learnwithme ##fypシ ##foryourpage ##moreyouknow ##musicproduction ##producertok♬ original sound – LANDR
We chose -12dB which should give us plenty of headroom.
Here’s what it looks like in Ableton.
2. Removing resonances
Sometimes samples will sound good on their own, but when adding other samples to the mix their harsh resonances pop out.
Usually, this is due to a clash between certain frequencies with others, so the next step is to remove any resonance we might hear on every stem.
To find resonance just use your EQ to sweep for harsh frequencies.
Play the sample on solo while you sweep through the frequencies. Here’s what it looks like in Ableton.

When you hear a frequency hurting your ears, it might be that it is too prominent in the sample or loop.
So, we need to dip that frequency by flipping reducing the gain on that particular frequency band.

How much you reduce or increase the gain is up to you. Do this with all the loops until you are satisfied with how everything is sounding.
3. Let’s make room in the trap mix!
Now that all our samples are cleaned up from resonance you want to make sure your samples are occupying the right part of the frequency spectrum.
For example in our full drum loop, which has a kick, I want those lows to cut through the mix, same with the 808 bassline.

But, I don’t want the melodies to muddy my low-end, since generally, melodies exist in a higher frequency band.
So let’s roll off the bottom-end of all my samples aside from the bass parts. It’s best to roll off 0hz to 250hz frequencies with your EQ.
4. Thicken up the bass
This is sounding better already, but if we want to rattle trunks and rock clubs, we need to add some saturation to those 808’s. It will make them more noticeable and glue them into the song.
Add a saturation plugin to your 808s and give it some drive, it’ll help warm them up by saturating the 808s with more harmonics.

It sounds much better! but now I’m noticing that it’s eating up too much headroom in my beat.
Let’s fix that!
5. Sidechain
Sidechaining is a technique that ducks the audio volume of one track when another track is playing.
In most cases, when mixing trap side chaining is used to make the kick duck volume of other sounds in the track.
For our example, we want the 808 sample to dip a few dB when the kick of the full drum loop hits.
Let’s apply sidechain to the 808s so that it dips when the kick hits, so we can bring back the overall punchiness of our full drum loop.
If you’re using Ableton, here’s a guideline for setting up your sidechain.
Set the EQ function to bell curve, move your frequency to 88.8 Hz and remember to keep the attack all the way down.
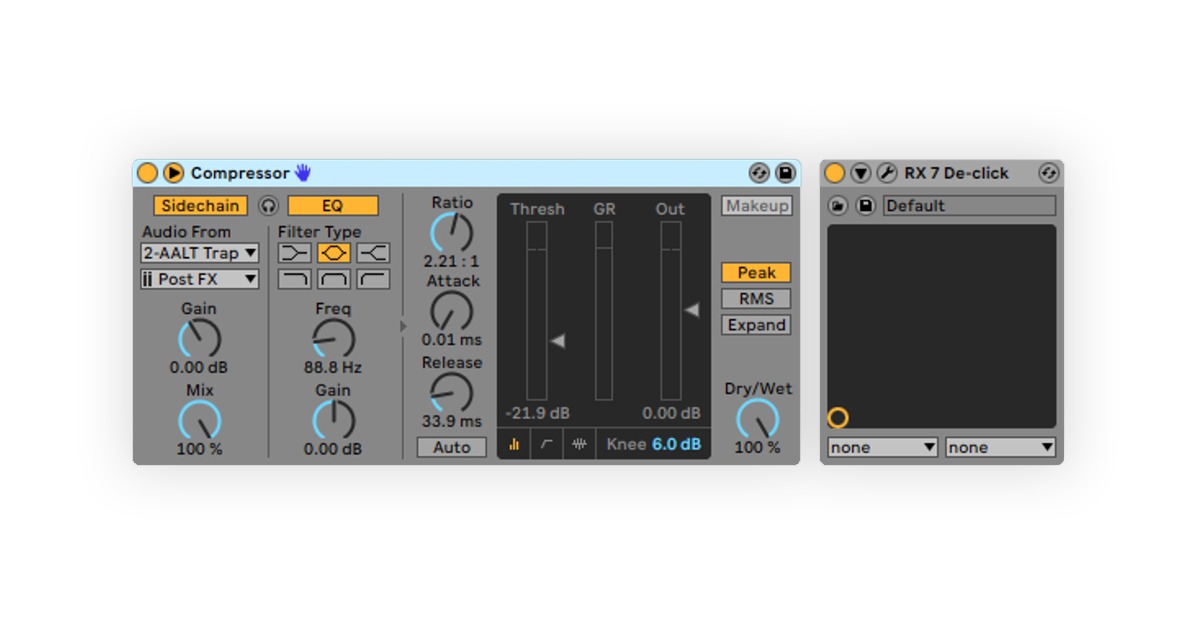
This is really important, it could ruin your song if your sidechain attack is too slow. However, in some cases, you might notice that lowering the attack also creates a new problem: clicks!
Because we are not using separate stems for the kick and snare, the sidechain is acting on more than just the kicks.
To fix that we need to use a de-clicker plug-in. I recommend RX7 de-click as it never has disappointed me so far.
Alright, I bet you can hear those 808s way better now. Good!
Side chaining is used to make the kick duck volume of other sounds in the track.
6. Set your levels
The key to a good trap mix is by giving yourself a lot of headroom.
At this point, no track in your beat should not cross the -10db mark. Try using a free plugin like Voxengo SPAN to help you get your track levels set up.
Now I’ll do the same with our 808s, but when playing solo they should be three to four dB less loud than the drums.
This is a handy trick for people that don’t have subwoofers and want to have accurate gain staging.
Once you have done that it’s time to add the rest of the stems to the trap mix. You can do that on top of your drums and 808s without touching them.
7. Stereo widening
Next, let’s to bring our instruments out a bit more by widening their stereo image.

Select any instrument you want to bring out and add an Ableton utility or if you work with a different DAW, a stereo widening tool. Add a bit of width and voilà!
Good luck trying these mixing trap tricks next time you work with samples!