The guitar is the most popular instrument on earth because it’s relatively easy to start learning.
Almost anyone can pick up a guitar and learn a basic chord progression in the first 20 minutes playing.
Of course, it takes a lifetime to master the instrument—but one concept to carry with you from the start of your guitar learning journey is the CAGED system.
No matter what your goals are on guitar, understanding the CAGED system, concepts, and purpose will greatly improve your playing and open up your knowledge of the guitar fretboard.
In this article, we’ll cover a handful of basics around the CAGED system. By the end, you’ll know how the music theory behind CAGED, how to learn it and why it’s so useful.
Open up your knowledge of the guitar fretboard.
Let’s dive in!
What is CAGED?
The term CAGED is a mnemonic device that simplifies the grid-like layout of the guitar fingerboard by using five open chord shapes: C, A, G, E, and D, as the foundation.
These five chord shapes are paired with five unique major scale patterns—one for each chord. Together they cover the entire fretboard logically and systematically.
Although these chords are easy to play in the open position, the CAGED system makes it possible to finger them as movable barre chords.
Using CAGED, each of the five chord shapes can be played in the correct positions all across the neck to reflect a specific key.
How to use the CAGED system
For this tutorial, we’ll be using the key of C major, so let’s check out what the chords look like in their original open position.
Learn how to ‘visualize’ the shape of the chord in its given scale pattern.
A strong command of this will help bring your soloing to life.
Then we’ll apply the caged system to find their barre chord grips when moved into the position on the neck that makes them a ‘C chord’.
In other words, we’ll look at how a CAGED A chord played as a barre chord at the 3rd fret looks like an A chord in shape but sounds like a C chord.
Don’t sweat it if a few of the barre chord grips are challenging to play (like G & D). The important thing is that you learn how to ‘visualize’ the shape of the chord in its given scale pattern.
You don’t necessarily have to stretch your hands to play the entire chord on all six strings.
Take note of where the ‘root notes’ are in each chord as this gives its name. All the root notes are the red dots embedded with an ‘R’ and the remainder have numbers that reflect each note’s specific interval degree from the root note.
The best notes to resolve melodic ideas and licks on when soloing are the notes of the root chord of the key you are playing in, which are always ‘Root, 3rd, and 5th’.
The 5 CAGED chords
Alright now that we’ve covered a bit of music theory, let’s take a look at the CAGED chords themselves.
The diagrams in each of the examples below will show the open chord at the top the neck and the corresponding CAGED chord that makes a C chord on the neck.
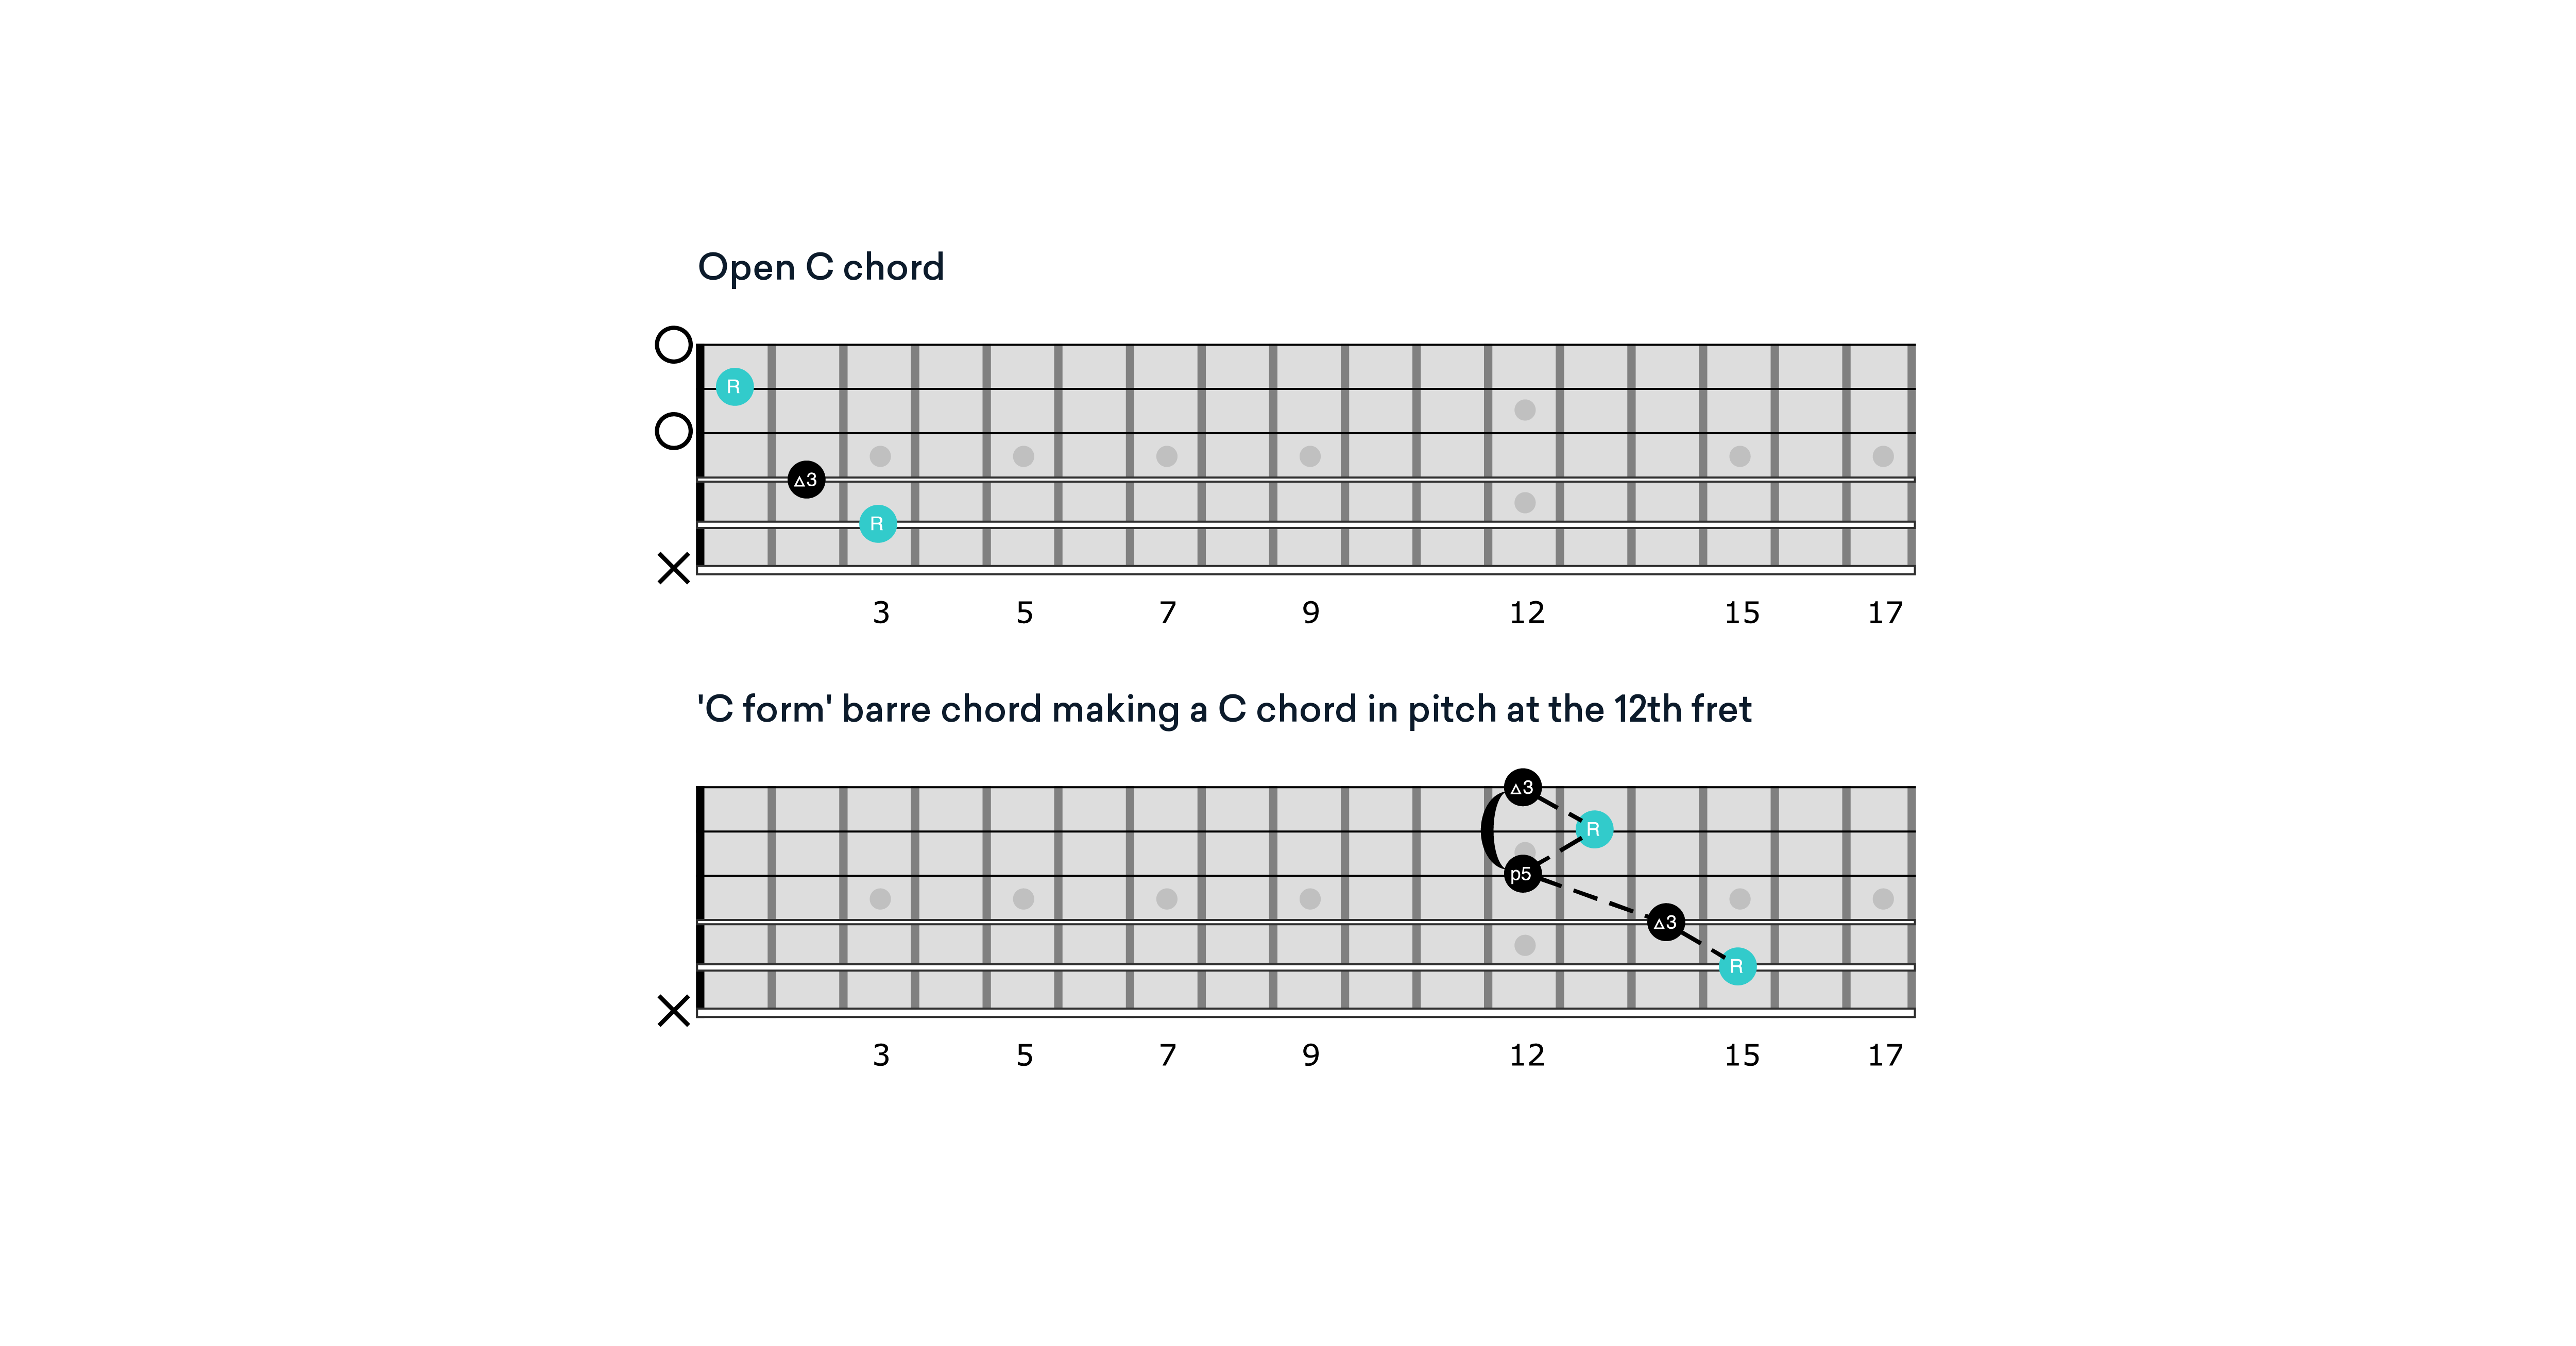
1. The C form chord
Example one illustrates an open C chord and ‘C form’ barre chord at the 12th fret making a C chord in pitch.
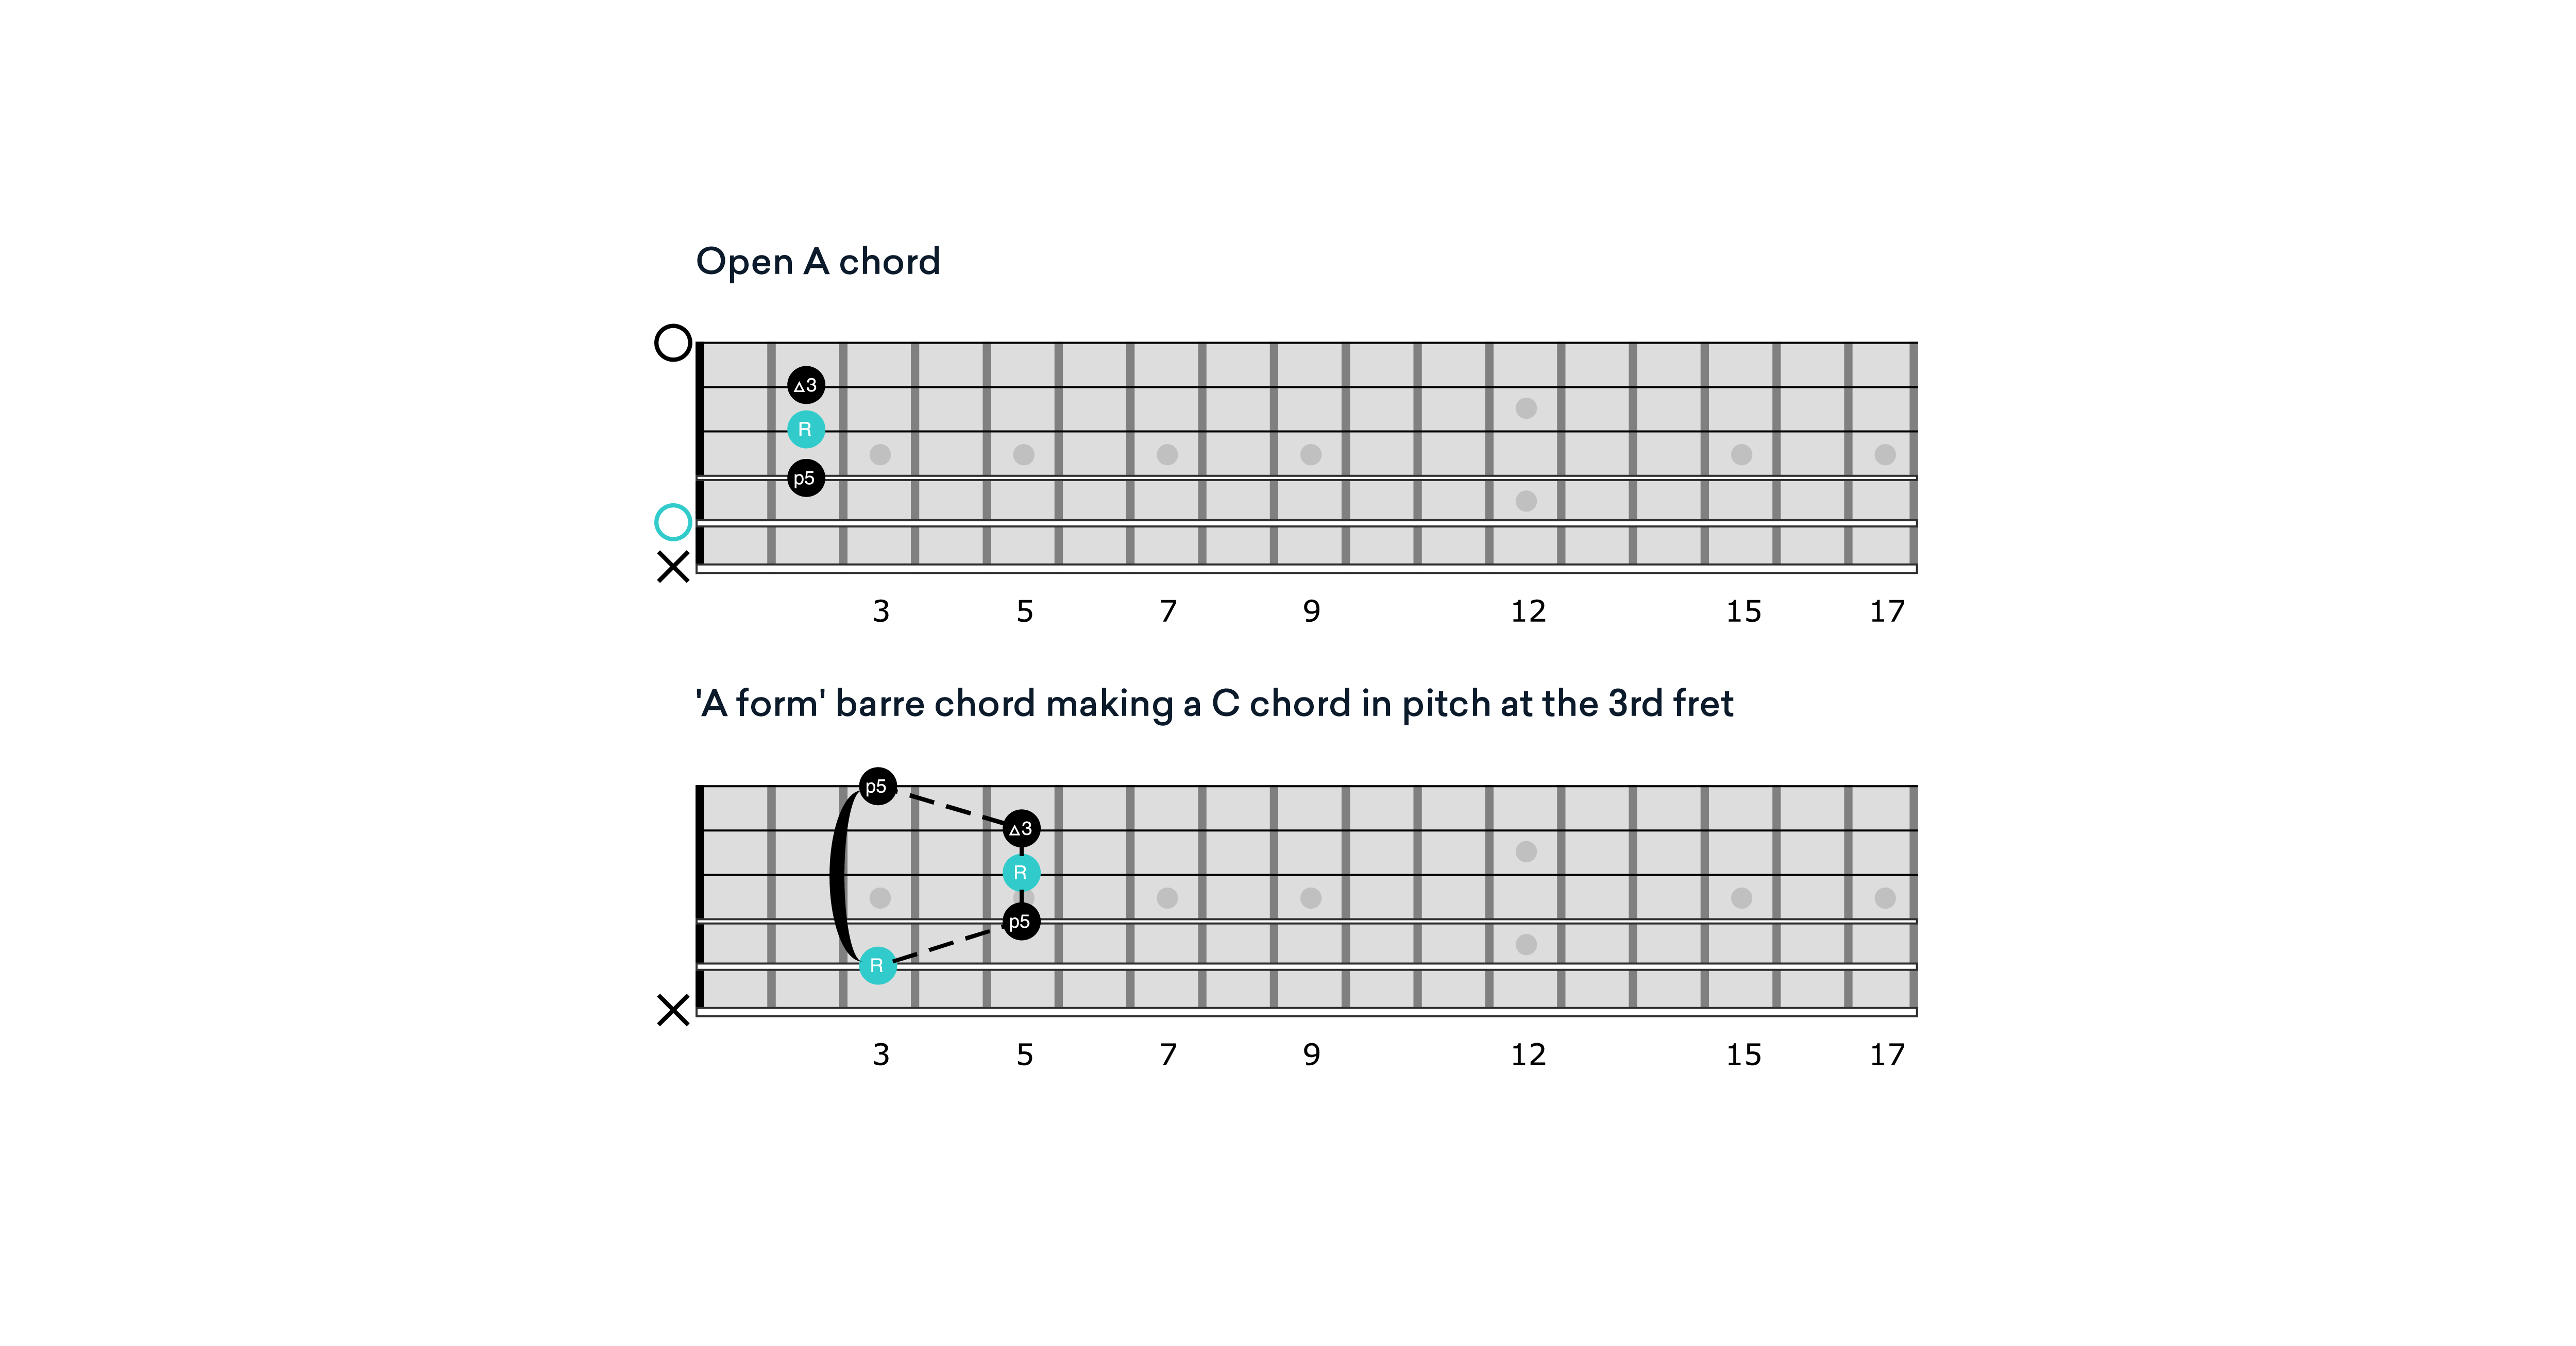
2. The A form chord
An open A chord and ‘A form’ barre chord at the 3rd fret making a C chord in pitch.
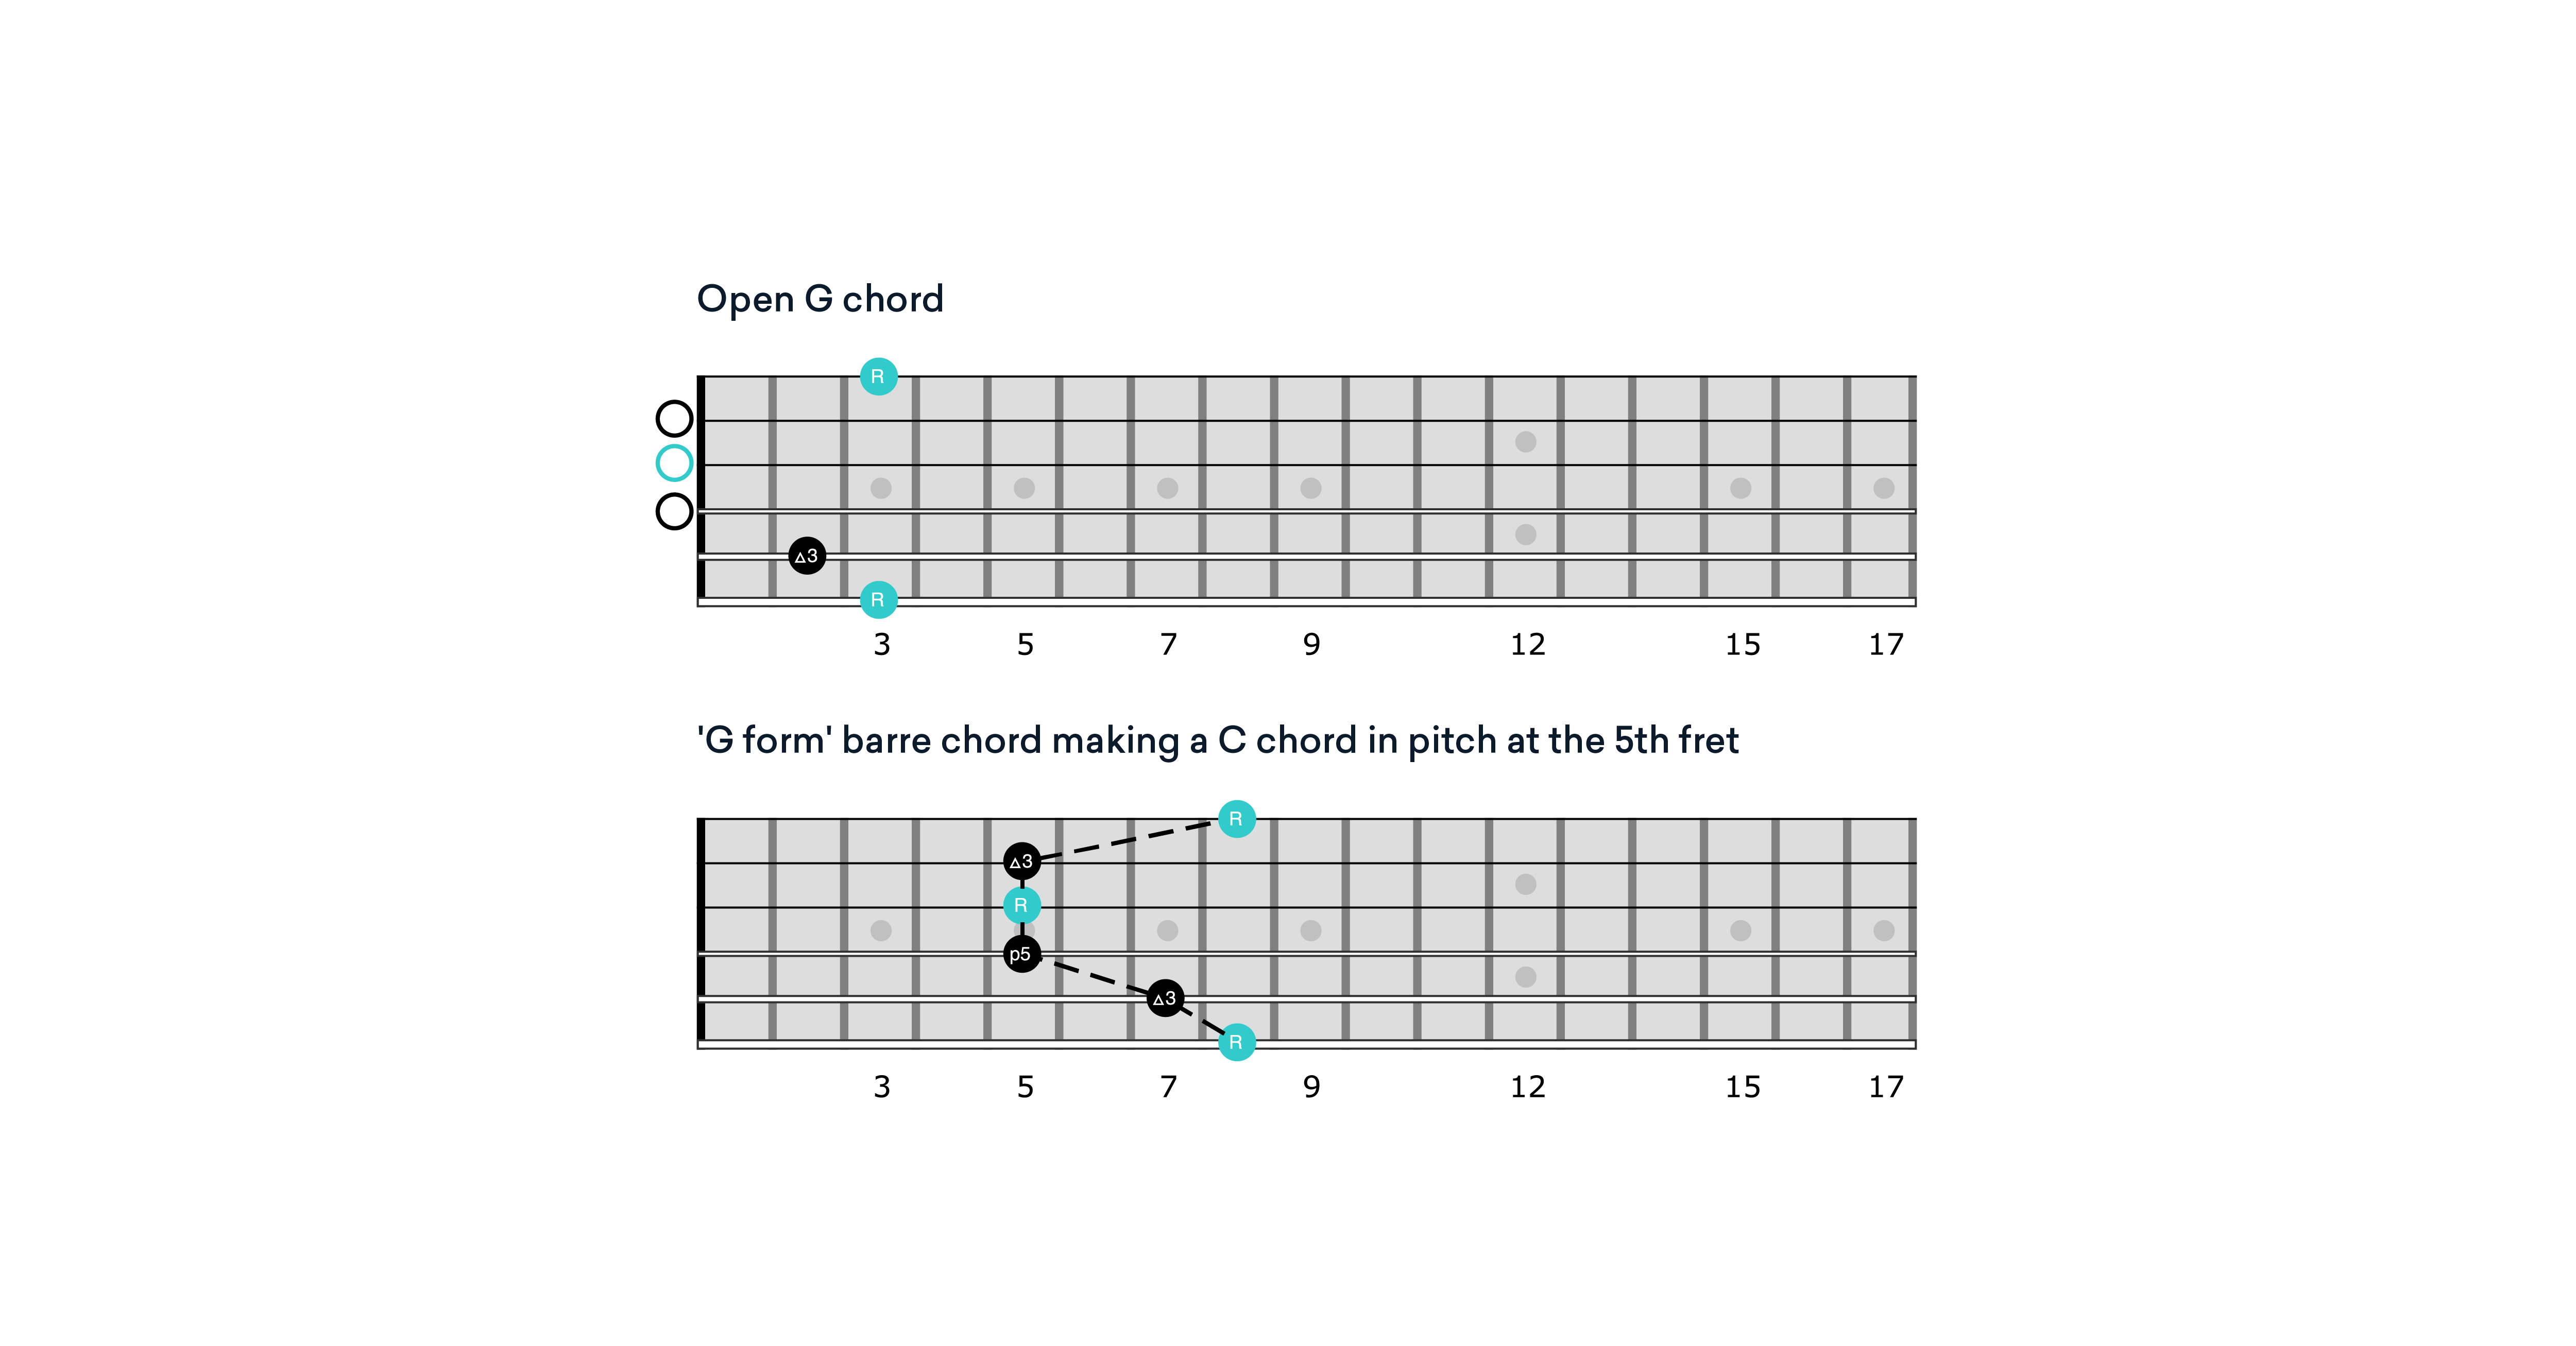
3. The G form chord
Here’s the open G chord and subsequent G form barre chord at the 5th fret resulting with a C chord in sound.
4. The E form chord
The open E chord and ‘E form’ barre chord is probably the most common bar chord because it’s the easiest to play. Grip this at the 8th fret to sound like a C chord.

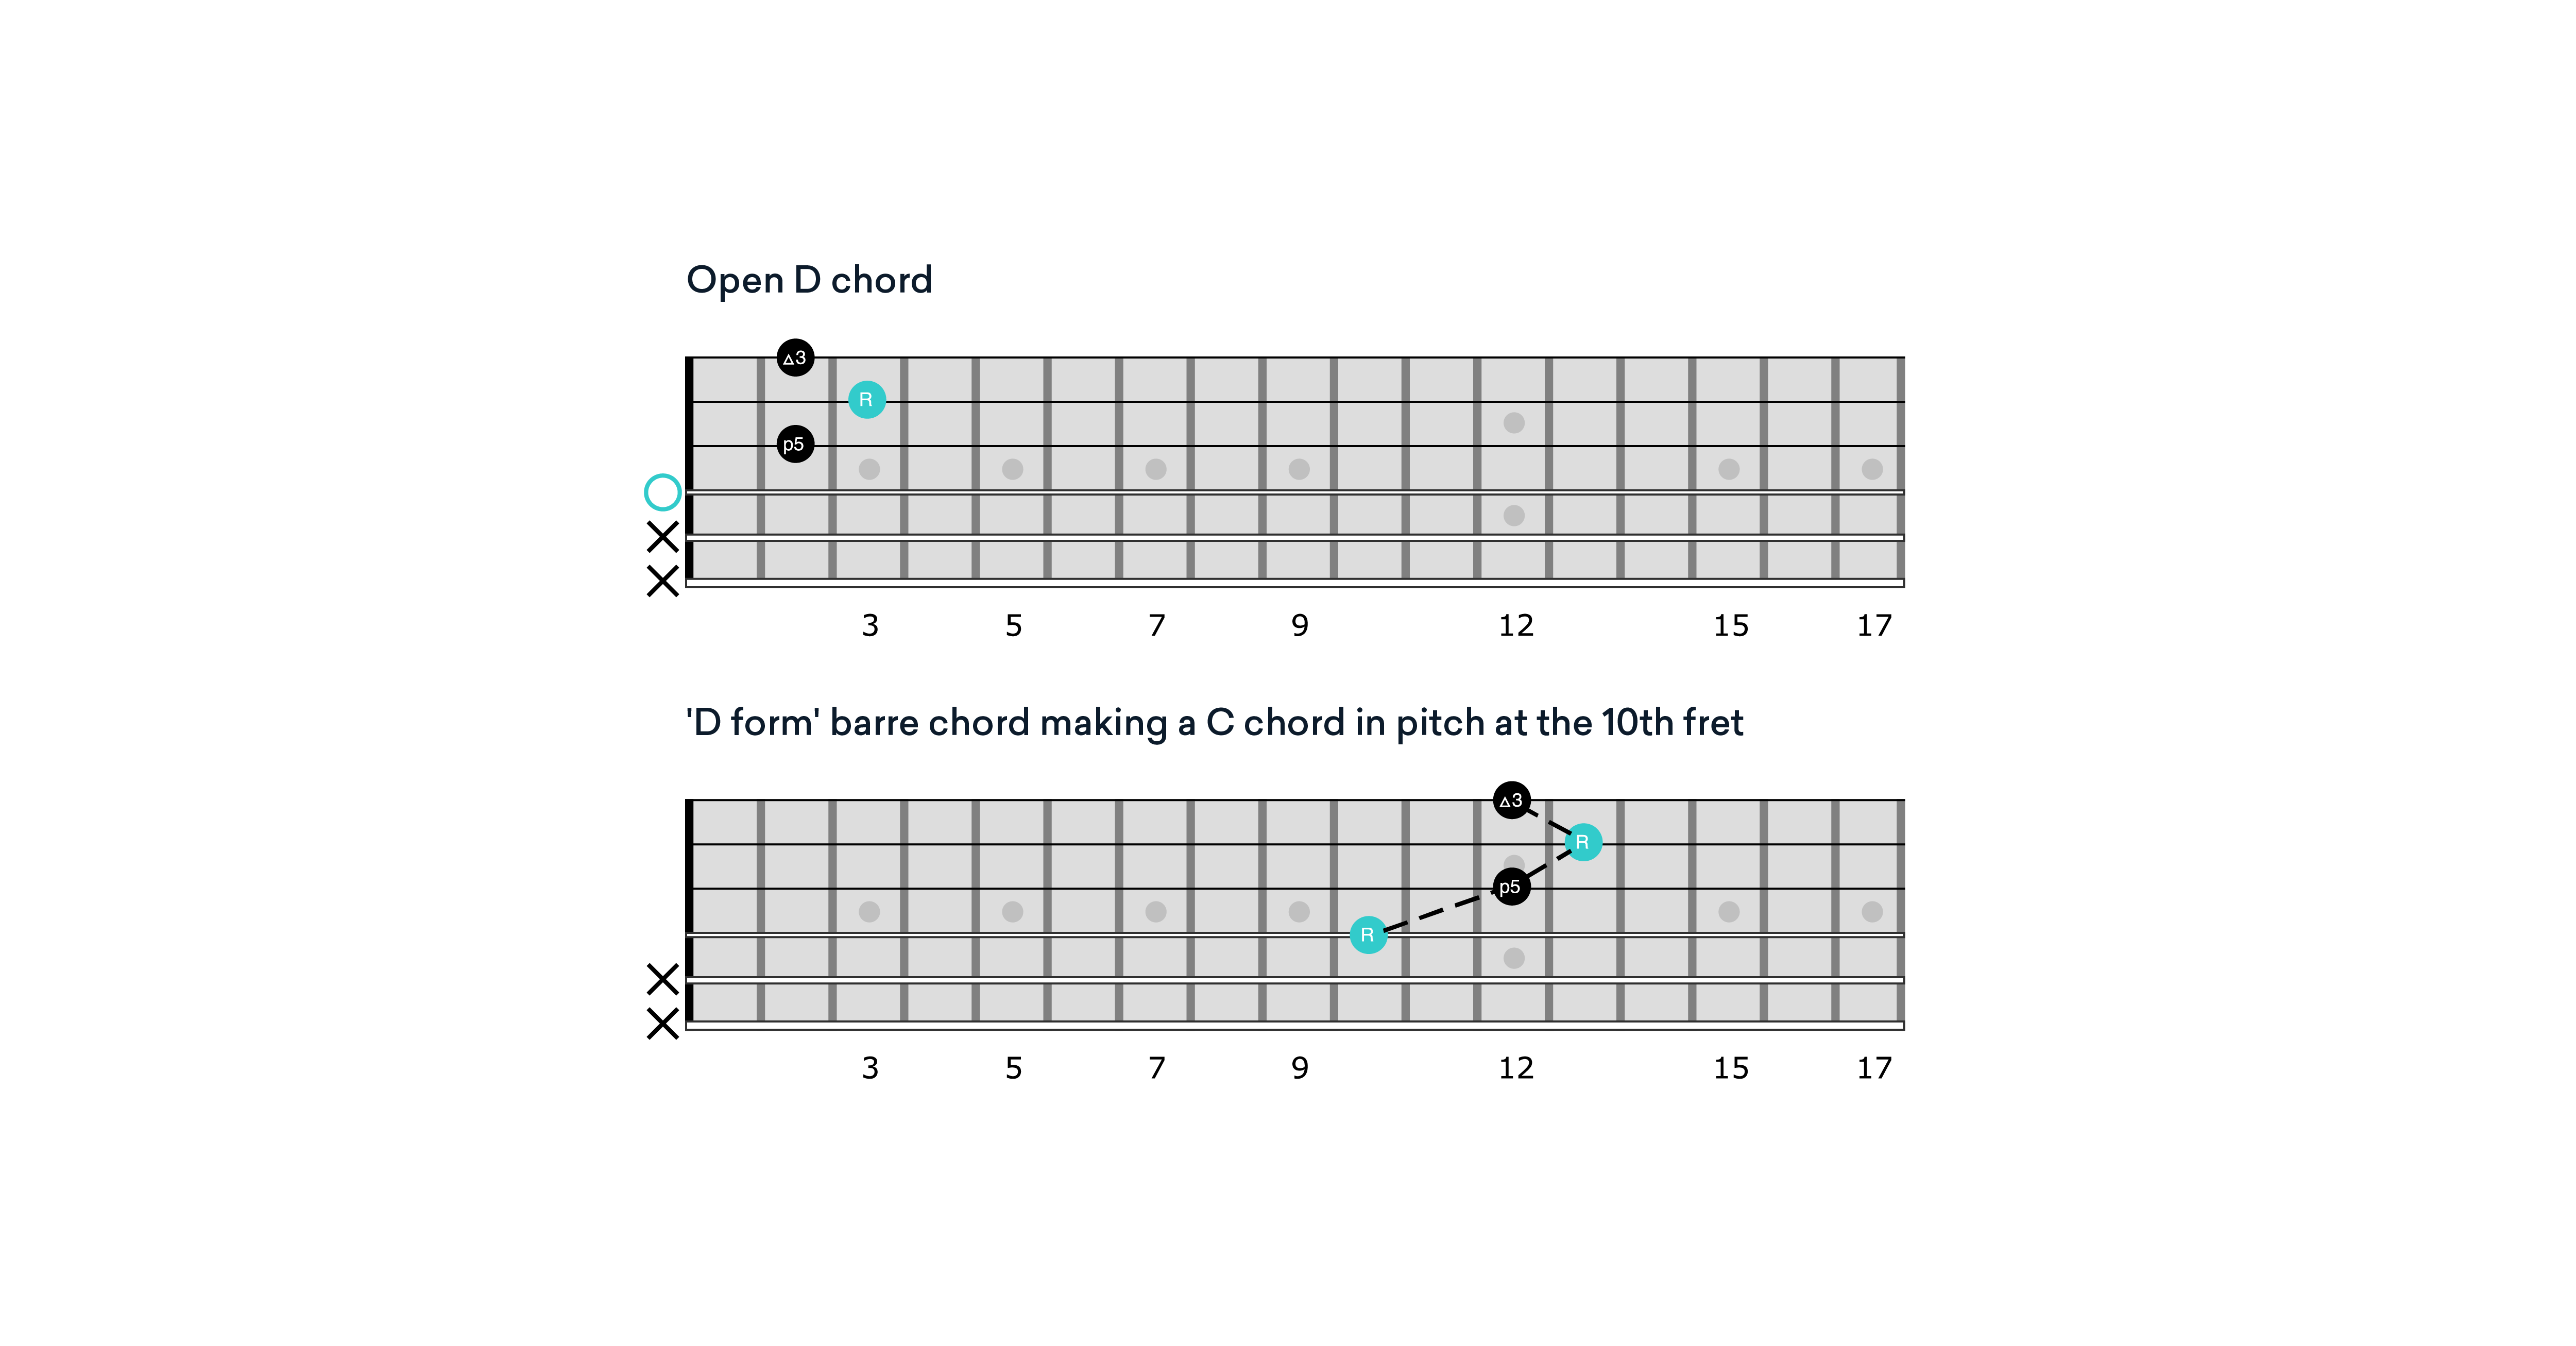
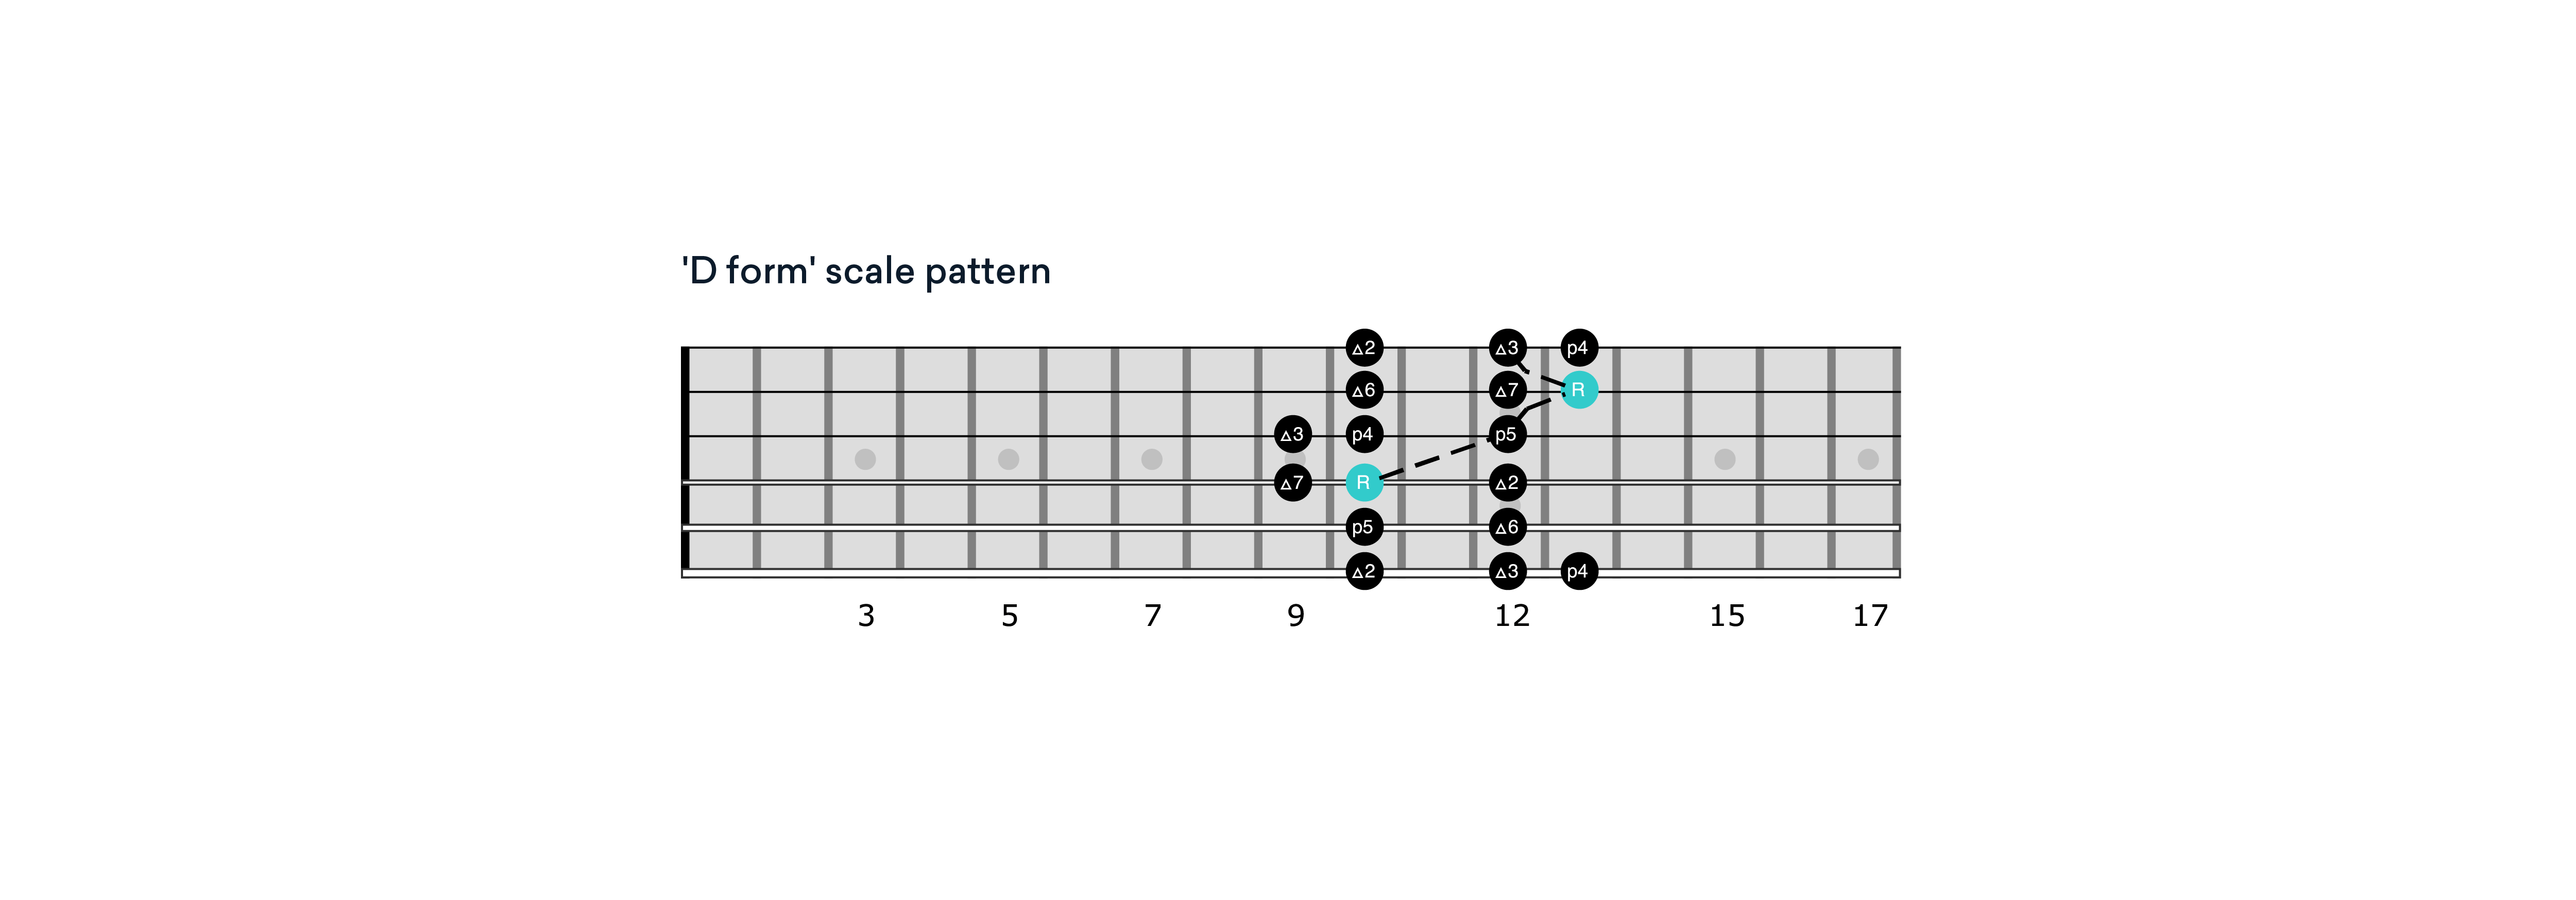
5. The D form chord
The final chord is open D and its ‘D form’ barre chord grip at the 10th fret produces a C chord in pitch.
Learning to solo with the 5 CAGED scale forms
Each of the five CAGED system chords is framed by a major scale of the same key. Connected dots outline the chord shape embedded within each scale pattern.
The other numbers in the scale (2, 4, 6, and 7), but not found in the root chord, are good notes for building and coloring your solos. After ascending and descending the scale, try ending on the lowest root note to create a melodic resolve.
Repeat this routine of ending on the lowest root note for each of the five scale patterns. Begin with the ‘C’ form barre chord and corresponding major scale that surrounds it.
The C scale pattern
Each chord has a unique major scale shape surrounding it in that position.
The diagram below illustrates the C major scale that frames this ‘C form’ barre chord shape. The chord tones are connected by the line.
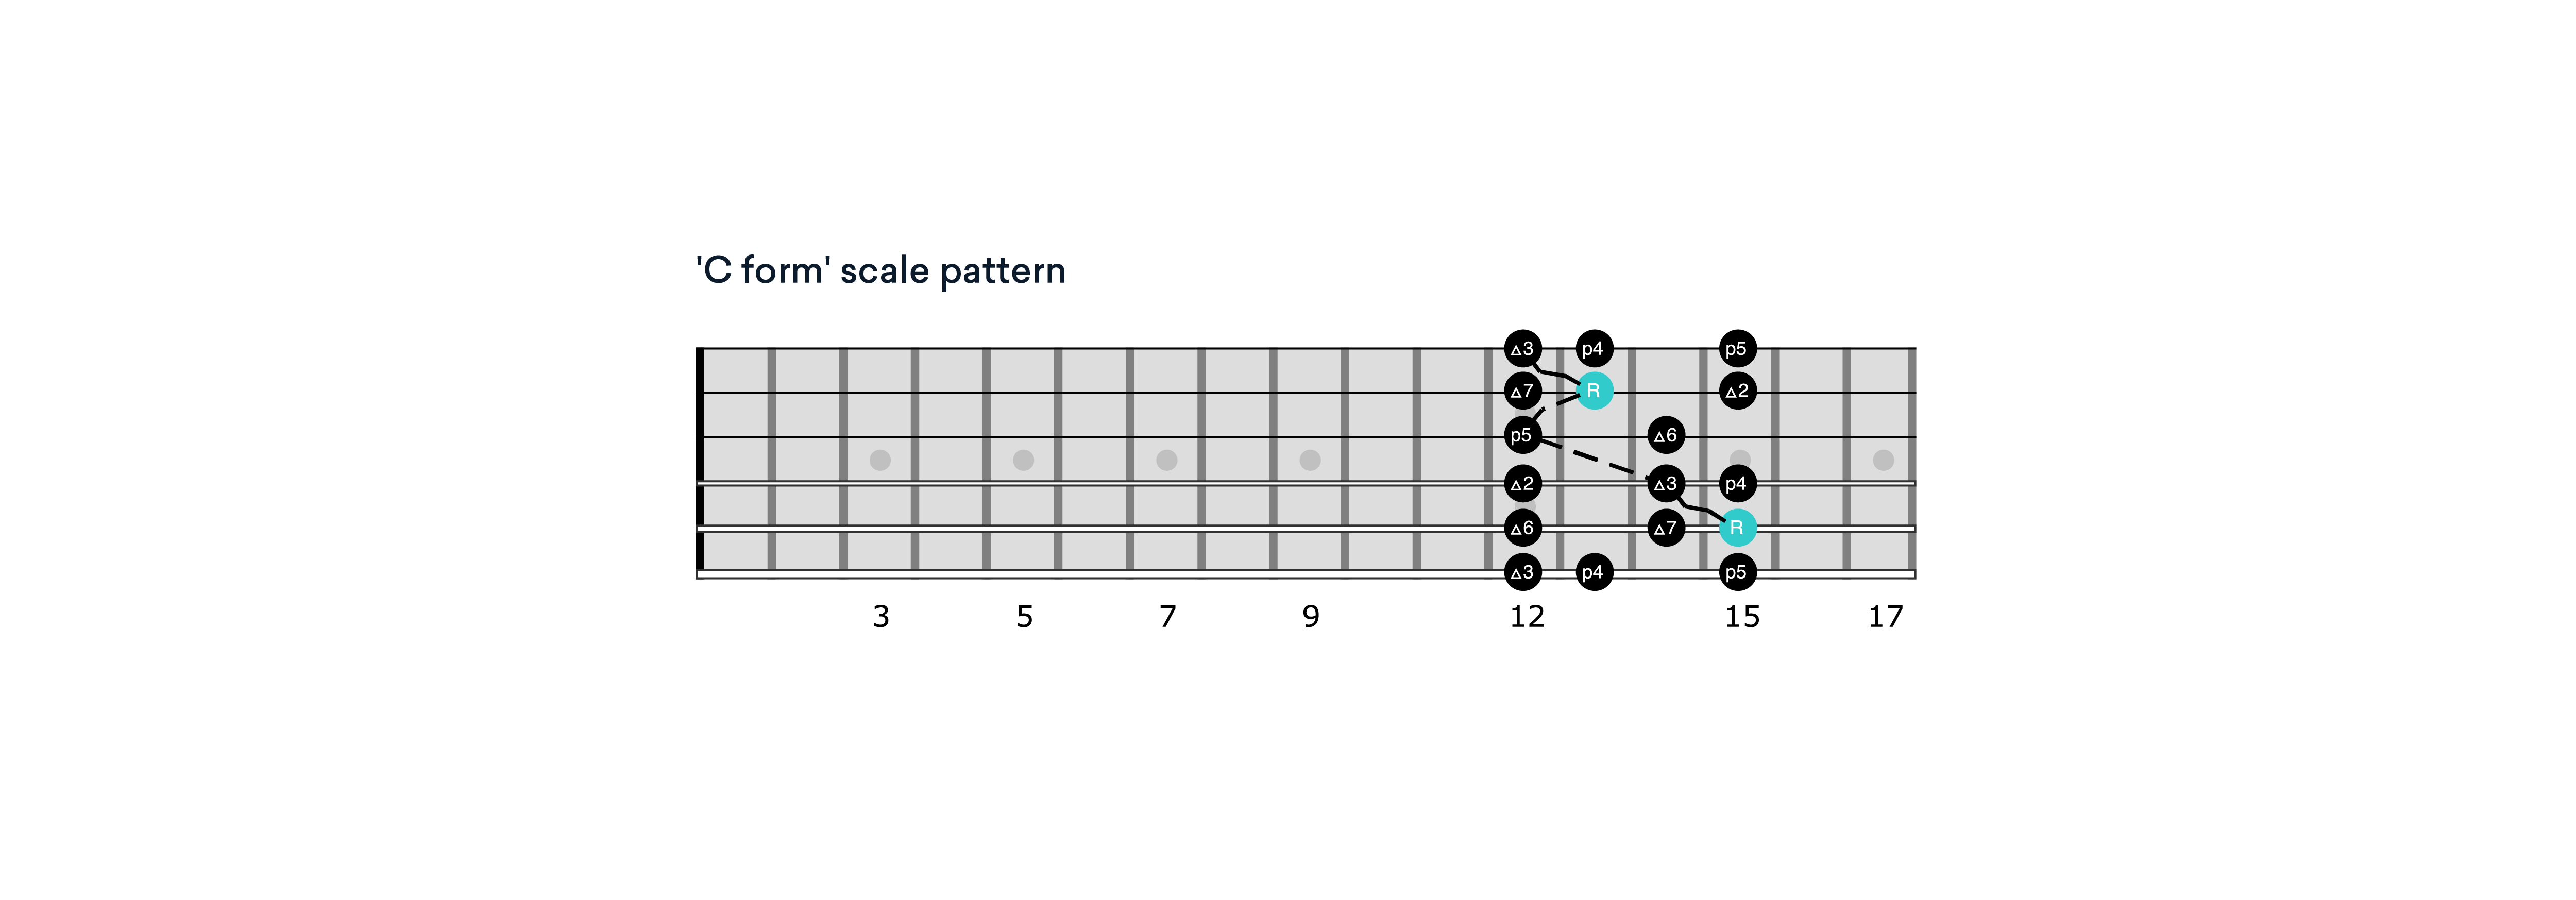
The notes of the chord are referred to as “chord tones” and make excellent choices to end a musical phrase on or focus melodic ideas around while improvising.
Use one finger per fret to play this pattern.
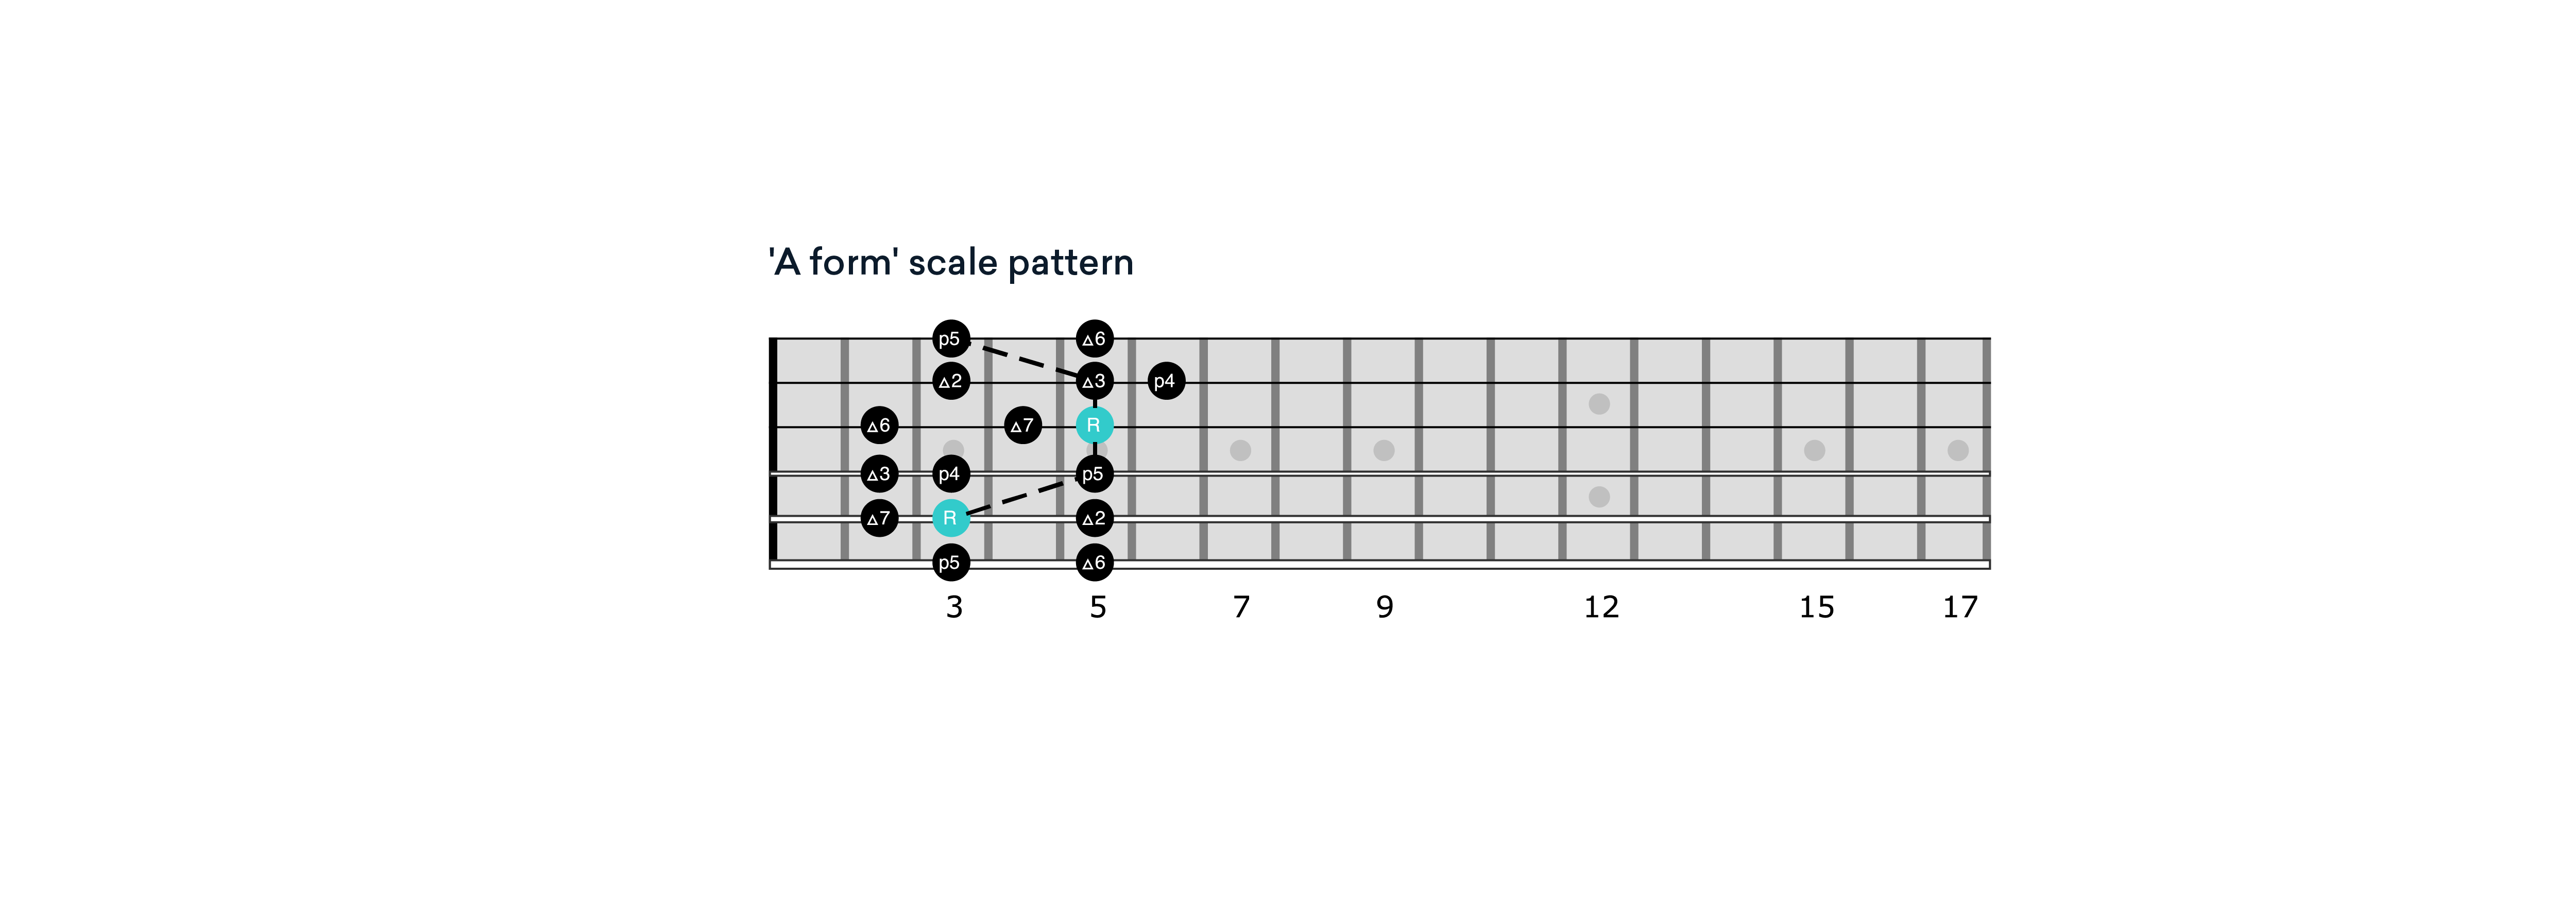
The A scale pattern
Here’s the ‘A’ form scale pattern with highlighted ‘A form’ barre chord shape. Try using one finger per fret until the second string where it shifts up one fret.
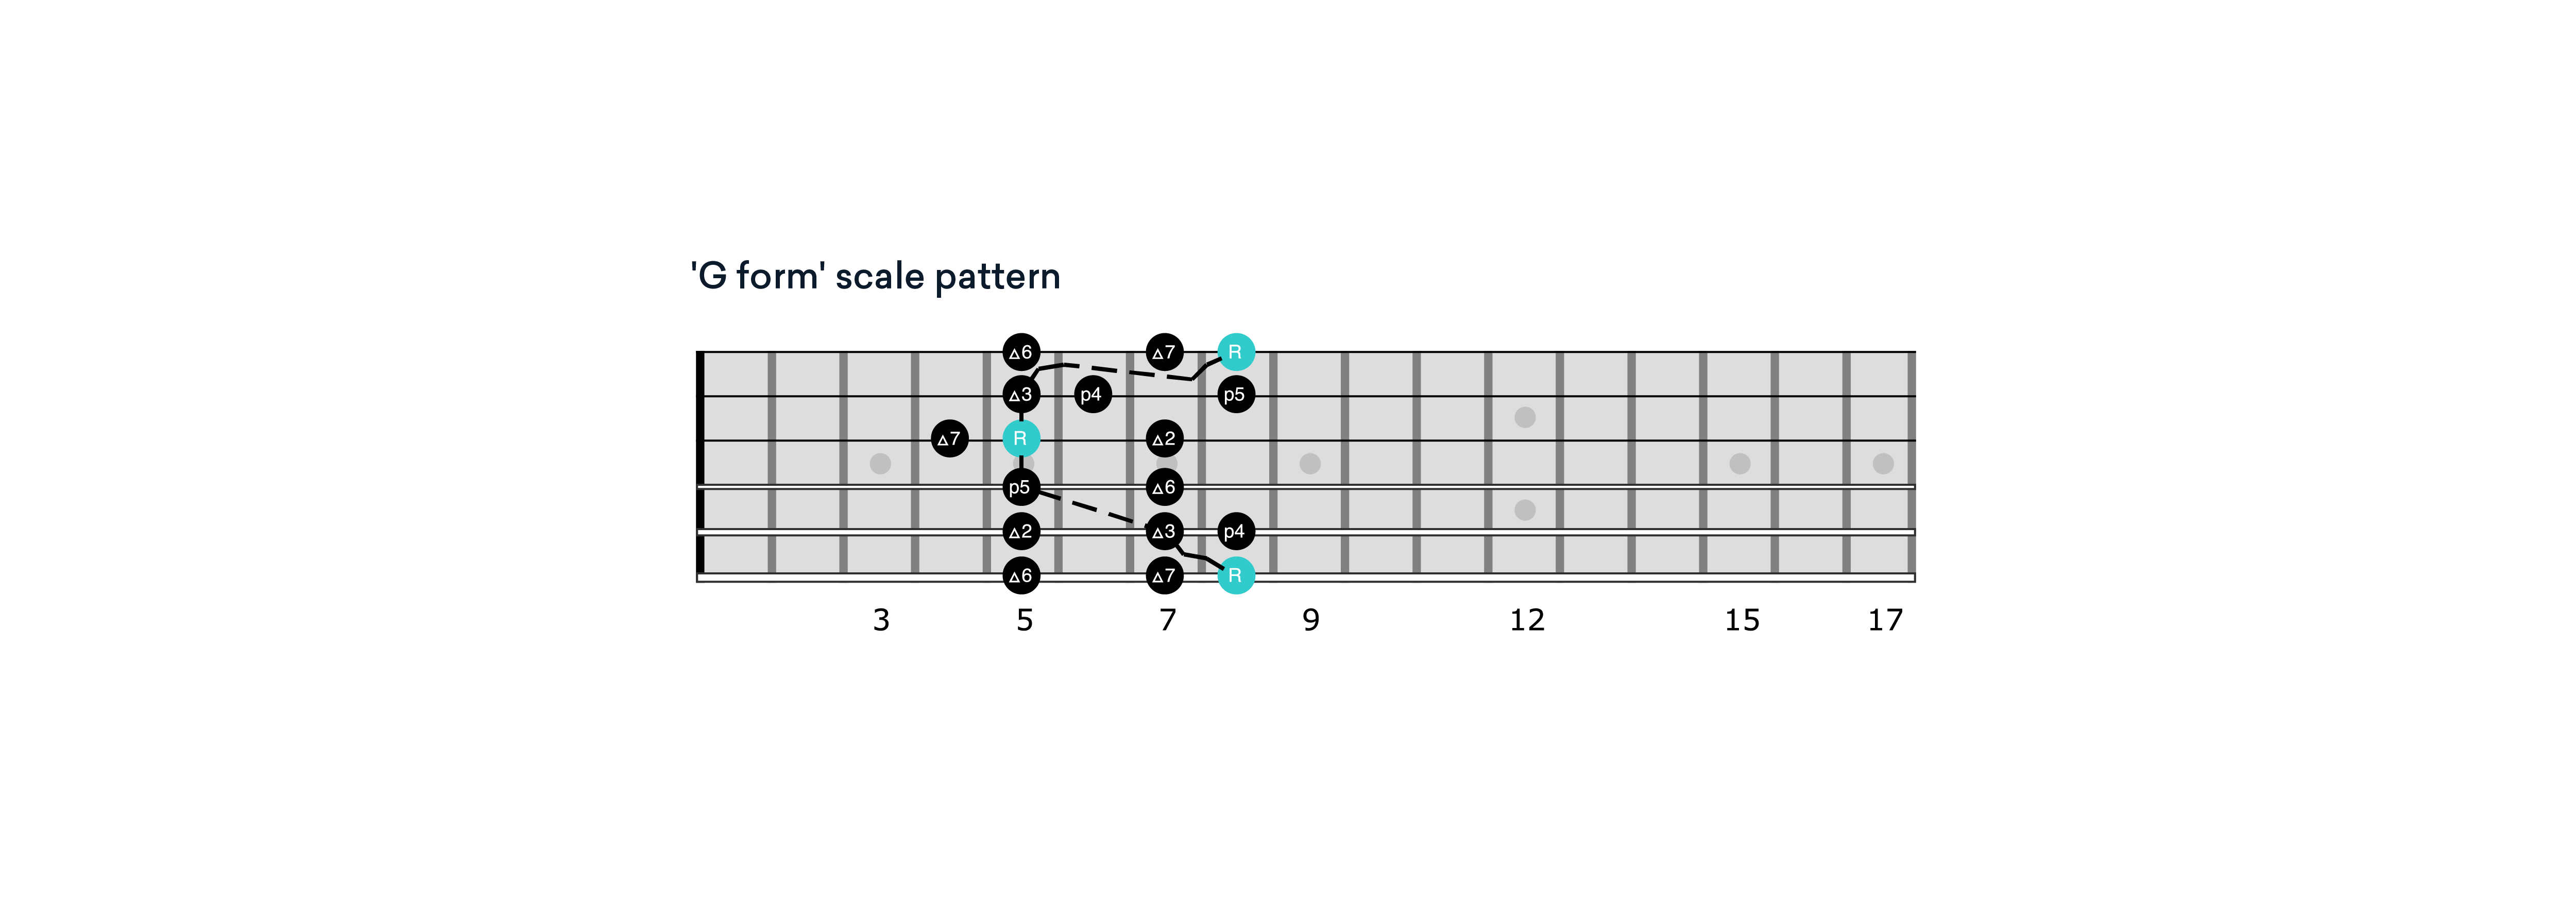
The G scale pattern
Check out the C major scale framing the ‘G form’ barre chord shape in this next example.
This pattern also uses one finger per fret until the third string which shifts back one fret (to the 4th fret) and then resumes the 5th position for the remainder.
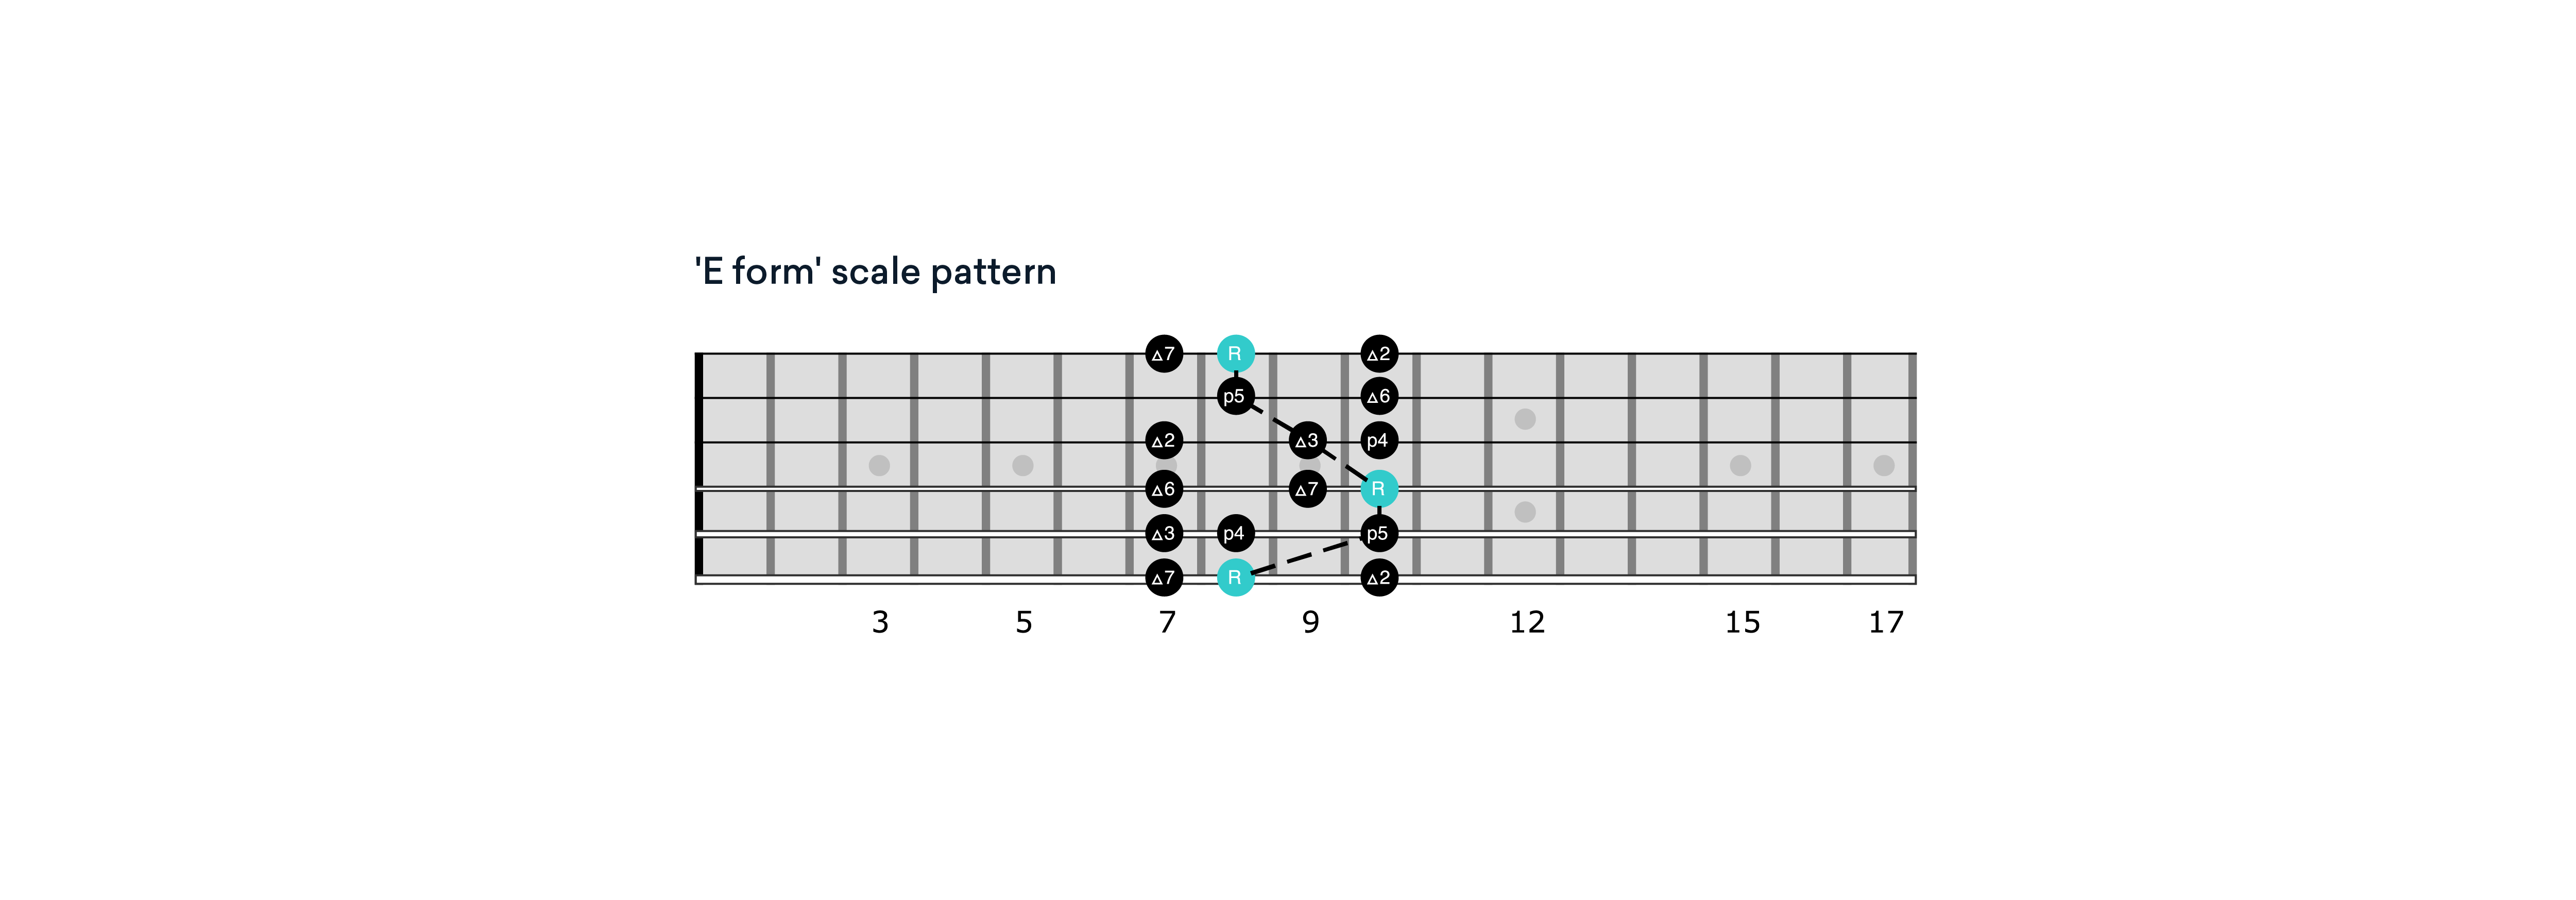
The E scale pattern
And the C major scale surrounding the ‘E form’ barre chord shape. This pattern is easy to play with one finger per fret and no position shifts required.
The D scale pattern
Check out the C major scale framing the ‘D form’ barre chord shape. Use one finger per fret in the 10th position, except for the D and G strings which shift back to the 9th fret.
These scale and subsequent chord shapes are the foundation for providing the best notes to focus your soloing and melodic ideas around.
Theoretically, any note can work, but the scales eliminate the worst notes and provide the most ear-pleasing melodic choices, while the chord tones offer superb resolving points in the solo.
There’s more to playing a melodic solo than running a scale up and down
But there’s more to playing a melodic solo than running a scale up and down and stopping on random notes.
You need to practice and memorize where the chord tones are in each pattern as possible resolving points.
A strong command of this will help bring your soloing to life, sound more musical, and tell a story with the note choices.
You do this by learning the scale patterns AND the chord tones that exist in each pattern. Practice these scale patterns with a metronome at a tempo you can play steadily with the beat.
Once they are memorized and can be played without looking at the diagrams, you are well on your way to mastering the fretboard.
The next step is to play the scale patterns over backing tracks in C major while improvising and experimenting to hear the scales in context.
Playing in Other Keys
To play these scale patterns in a different key locate the root notes in the desired pattern and move the scale up or down the fretboard until the root notes are parked on the new key (this will require one to know or get to know the notes on the fretboard).
For instance, to play the C form scale pattern in the key of G, locate the G root note on the 5th and 2nd string (10th and 8th frets respectively). Next, reposition the scale so that the root notes for the
C form scale patterns are on the G’s.
A great approach to internalizing the CAGED system is to memorize one pattern at a time, working it up and down with a metronome.
Try tackling one pattern every week or two and adding the next in order when you are ready.
After this stage, and if you are up for a challenge, try playing ascending and descending scale sequences of threes and fours through each pattern.