There are a few topics out there that never fail to get engineers ranting and raving. Y’know, topics like loudness, compression, mastering and…
Dithering.
Dithering can be an intimidating subject—it has a lot to do with the fundamentals of digital audio.
But applying dither correctly is incredibly simple and easy. Once you know what you’re doing and why you’re doing it, you’ll never have to stress about whether to dither or not again.
What is dithering?
Dither is low level noise added to your audio to reduce errors when changing bit depth.
I know what you’re thinking, “how can adding noise make my recordings sound better? Isn’t noise a bad thing?”
Dither isn’t just an audio term—and the noise it adds is really more like random variation.
In fact, the word dither means “nervous vibration.” It comes from how it was discovered.
Engineers found that mechanical aircraft computers performed more accurately in flight than on the ground.
The vibration from the plane’s engine actually helped increase the accuracy of the sticky moving parts in the machines.
The noise that dithering adds to your tracks works the same way. It helps increase the accuracy of your digital audio files.
When should you dither?
Before we get too far into the nuts and bolts, let’s start with the best practices.
Follow these three guidelines and dithering won’t cause you any trouble:
- Don’t change file types unless you absolutely have to. If you tracked at 24-bit/44.1kHz, just stay there! If for some reason you need to downsample, be sure to dither during conversion.
- Save dithering for when your files are headed outside of your DAW. Dither only once—during export.
- If you’re sending your files for mastering, leave dithering out if you can export 32-bit float files. In this case, the mastering process will take care of dither for you. When you export anything other than 32-bit float, you have to dither. That includes when you bounce files that are the same bit-depth as the ones you recorded.
That’s it! If you never want to think about dither again you can stop right here and get back to your latest project. But if you’re still confused, or if you want to know why you should follow these rules, read on.
I’ll go through everything you ever wanted to know about dither but were afraid to ask.
When you select the bit depth, you’re actually choosing the accuracy of the files you create during recording.
Bit-depth
Let’s start at the beginning. We’re talking about digital audio here!
The files your computer creates when you record are digital representations of the analog signals created by whatever you plug into your audio interface.
Before you start recording, you have to choose a sample rate and bit-depth for your DAW session. When you select the bit depth, you’re actually choosing the accuracy of the files you create during recording.
Each additional bit increases the resolution that your ADC (analog-to-digital converter) has to measure the level of an incoming signal.
That’s why we recommend you record 24-bit files for LANDR mastering. They’re the best option available in most DAWs.
Reducing the effects of error
Once your files are in your DAW, lowering the resolution is tricky. Reducing the bit depth will introduce digital error if you’re not careful.
But you’ll have to do it at some point in your process. Here’s why…
Your DAW makes the calculations that power your faders, busses, and plugins at a higher resolution than your audio files.
Your DAW makes the calculations that power your faders, busses, and plugins at a higher resolution than your audio files.
That means that unless you’re exporting your files in 32-bit float, you’ll be lowering the resolution of your tracks when they leave your DAW—and introducing error!
Error in your digital files has real world consequences for how your tracks sound. It can translate to harsh noise and distortion.
This distortion only happens in the quietest part of your system’s dynamic range, but proper dithering fixes it!
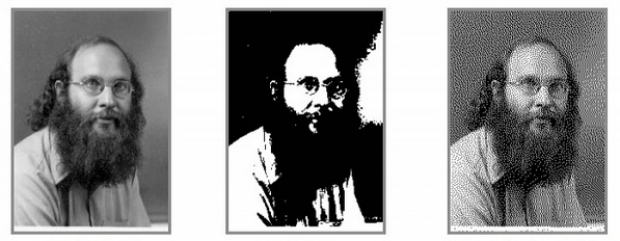
Visualizing error
To see what I mean, let’s see what error looks like in an image, which is just another kind of digital file.
- The image on the left is the original. It’s like the file you recorded into your DAW at full resolution.
- The middle one is like taking those pristine files and dramatically reducing their bit depth. It’s pretty hard to recognize the image.
- The one on the right has been reduced the same amount, but this time with dither applied.
It looks a lot better! But how can dither make a low-resolution image look better?
When we reduced the resolution, we had to throw out a lot of the information in the file that allowed us to see the detail.
How that information gets thrown out is why dithering is important. Keeping the errors to a minimum has a big impact.
Let’s look at exactly what happens when bit-depth reduction gets rid of information in your audio files.
Rounding and truncating
Imagine we have to change 24-bit files into 16-bit ones. To make them fit, all the information from the original 24-bit files has to go into the 16-bit spaces.
That means something has to get left behind. But how can you do the least damage?
The first option is to simply cut the numbers off to make them fit. This is called truncation and it’s the least accurate way of solving the problem.
Instead of just cutting the numbers off, we can try rounding them up or down to get closer to representing the 24-bit audio in 16-bits.
But what happens when the number you need to round is right in the middle? You could try a rule of thumb—say you decide to round up every time you encounter a number right in the middle.
This way at least you’ll be correct some of time. The trade-off is that you know you’ll be wrong just as often! This is called rounding error.
The noise (or random variation) that dither adds essentially randomizes the decision to round up or down.
After dithering, the distortion that would be created by truncation or rounding has a much less detectable effect.
After dithering, the distortion that would be created by truncation or rounding has a much less detectable effect.
Dithering Heights
All this business with rounding and error may seem completely academic, but correct dithering can make a difference in your final product.
At the very least, adding dither at the correct point in your project is the closest thing you can get to improving your mix with one click, even if it’s just a small improvement.
As an engineer you should strive for the best possible sound you can—and not miss any opportunity to make it better.
Now that you know your way around dither, get back to your DAW and bounce some tracks.
The post What is Dither and When Do You Use It? appeared first on LANDR Blog.