The vocals are THE MOST important part of the song. Once you’re done recording vocals, you need to take your time and mix them right.
But vocals are tough. They can be inconsistent, out of tune, out of time, and every single one sounds different.
So how do you get your vocals sounding their absolute best before you release your music?
That’s exactly what we’re going to cover today. In 6 steps, you’ll be able to create some absolutely amazing vocals.
Let’s get into it! But first…
Decide on your vocal sound
Before you start mixing your vocal, decide what your target is. What do you want your vocals to sound like?
A common mistake in mixing is to follow tutorials without thinking. You put on effects and twist knobs just because a few articles told you to.
But you have no idea what sound you’re actually trying to create. You’re basically mixing blind.
ALWAYS make sure you’re mixing with intention. When you’re adding compression and EQ, do it with a certain sound in mind.
That way, any mixing moves you make will be more accurate and will get you closer to the actual sound you’re looking for.
This is especially important with vocals because they differ so much between genres.
- In rock and metal vocals are traditionally rougher and punchier. They use more distortion and a slower attack with their compression.
- In pop and R&B, they’re extremely consistent and exciting. They use lots of compression and effects.
- In folk and jazz, they’re raw and clean. They don’t process the vocals much at all—a little bit of compression, EQ, and reverb.
How do you decide what your vocal target should be? Pick a few reference tracks and base your target on their vocal sound.
Not sure how to use references? Check out this video on using reference tracks and find the right material to guide your mix on.
Once you’ve decided on the vocal tone you want, it’s time to start your mix.
Step 1: Get rid of any nasty frequencies with EQ
First off, you need to clean up your vocal.
If you’re recording vocals at home, you’ll likely have some room resonances.
These are basically frequencies that are extra loud in a particular room, due to its size, shape, and amount of acoustic treatment.
Unless you’re recording in a nice studio, the room you’re recording in was likely designed for some other use. A bedroom, a basement, a closet… these will all have room resonances.
To find them, put an EQ plugin on your vocal. Boost one of the bands by 12-24dB at a Q of around 3.
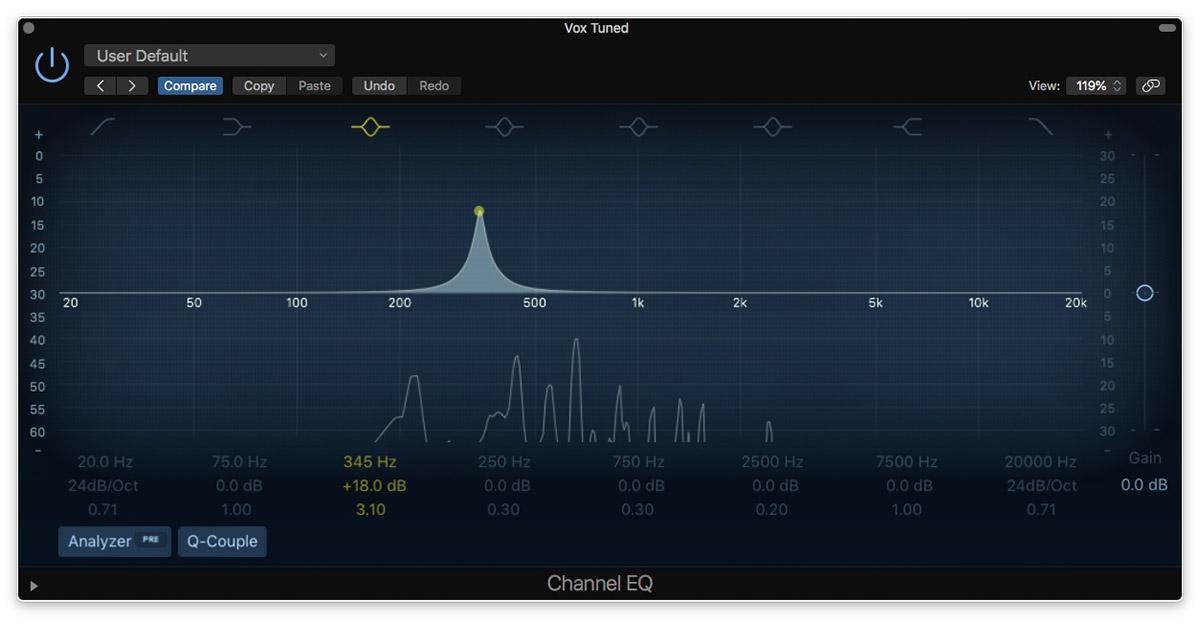
Then move the EQ band slowly from the low end to the top end. This is what’s known as an EQ Sweep.
Listen as you’re sweeping. Do any of the frequencies jump out and get extra loud? Do any frequencies sound particularly “nasty” to your ears?
These are likely room resonances. You’ll want to cut these out.
How much you cut (and how wide the cut is) will depend on that particular track. Sometimes the resonance isn’t that bad—a few dB should do the trick.
Try to concentrate mainly on the biggest problem areas. Your room probably has lots of resonances, but focus on the ones that’re most annoying.
Too many high Q filters can cause phase shift and comb filtering if you’re not careful.
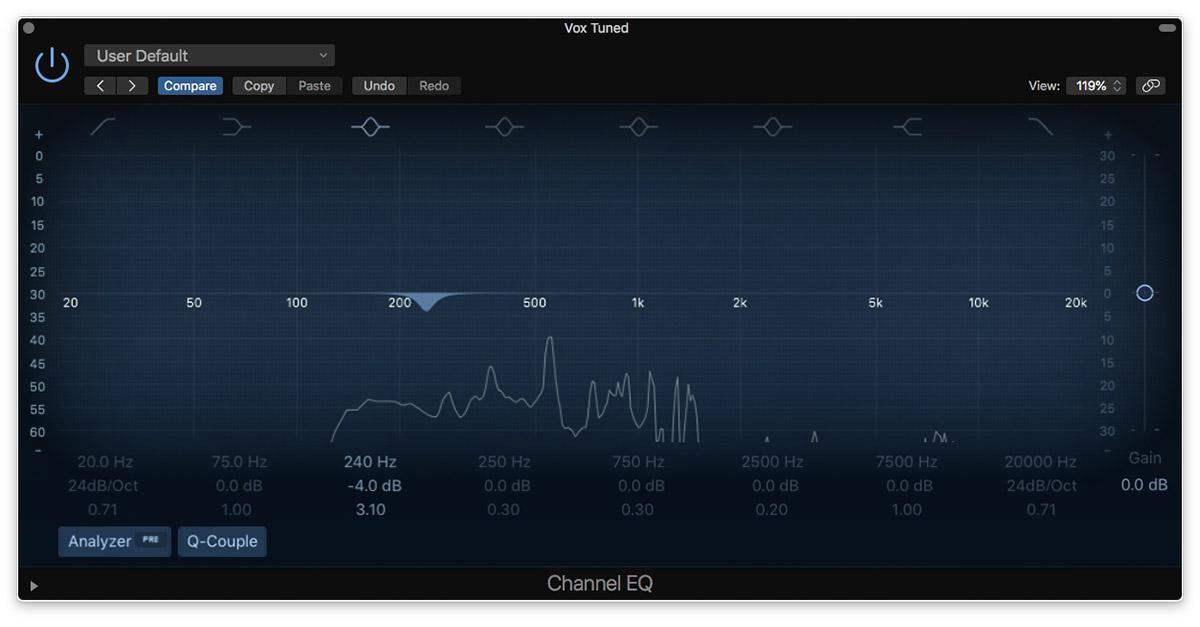
Sometimes it can be really bad. You may even have to cut 10-20dB out of the sound.
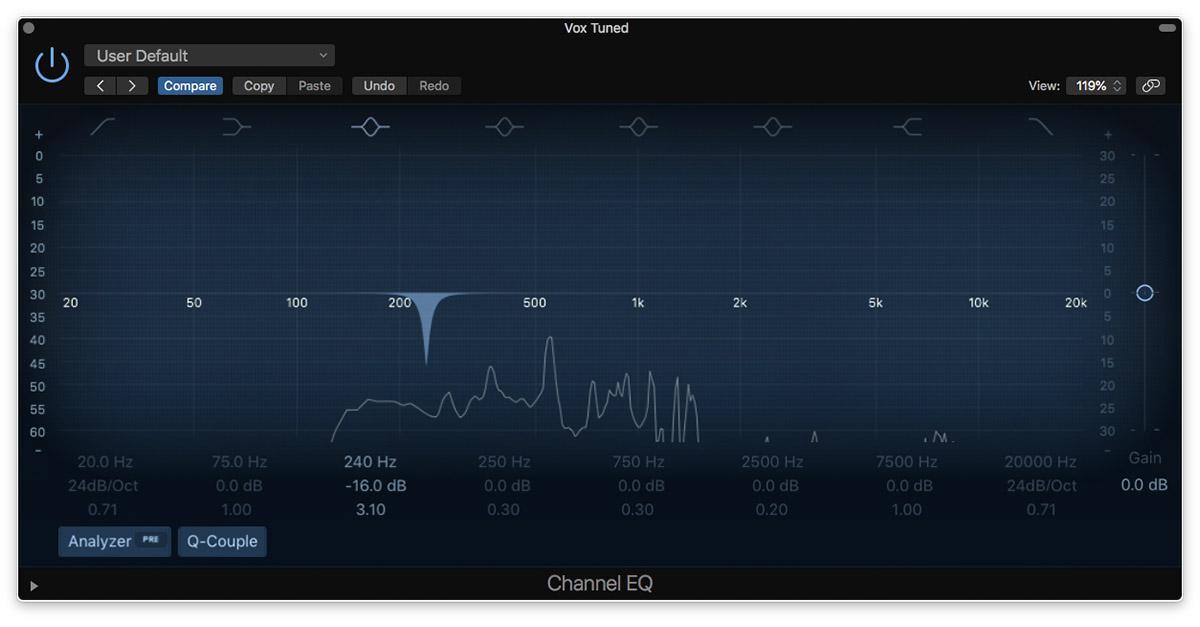
As far as the width (Q) goes, just remember this: if it sounds like it’s in one specific area, a narrow Q will do. Think between 5-15. If it sounds like it’s in a wider area, then a slightly wider Q will help. Somewhere between 2-5.
Once you’ve cleaned up your audio, it’s time to move onto the next step: de-essing.
Step 2: Tame your sibilance with a de-esser
Vocals are notoriously difficult to tame. And a big reason why is sibilance.
To put it simply, sibilance is the sound you make when you say a consonant (like s, t, or z). It’s that “hiss” sound that you make with your tongue.
In the real world, sibilance doesn’t really bother anyone. It sounds normal. But microphones tend to accentuate it, making it sound unnatural and harsh.
That’s why we have de-esser plugins. They’re meant to tame that sibilance.
Before you start: this step is optional. If your vocal sibilance sounds normal, then don’t try to de-ess it! It could make it sound much worse.
De-essers are basically multiband compressors. They compress a very specific part of the frequency spectrum, and are only triggered when that part gets too loud.

They’re pretty simple to use. First, solo the vocal and loop a particularly sibilant part of the song. Then, turn on the “monitor” or “side-chain” mode. Sweep around until you find an area that sounds particularly harsh during sibilance. Once you’ve found it, switch it back to regular.
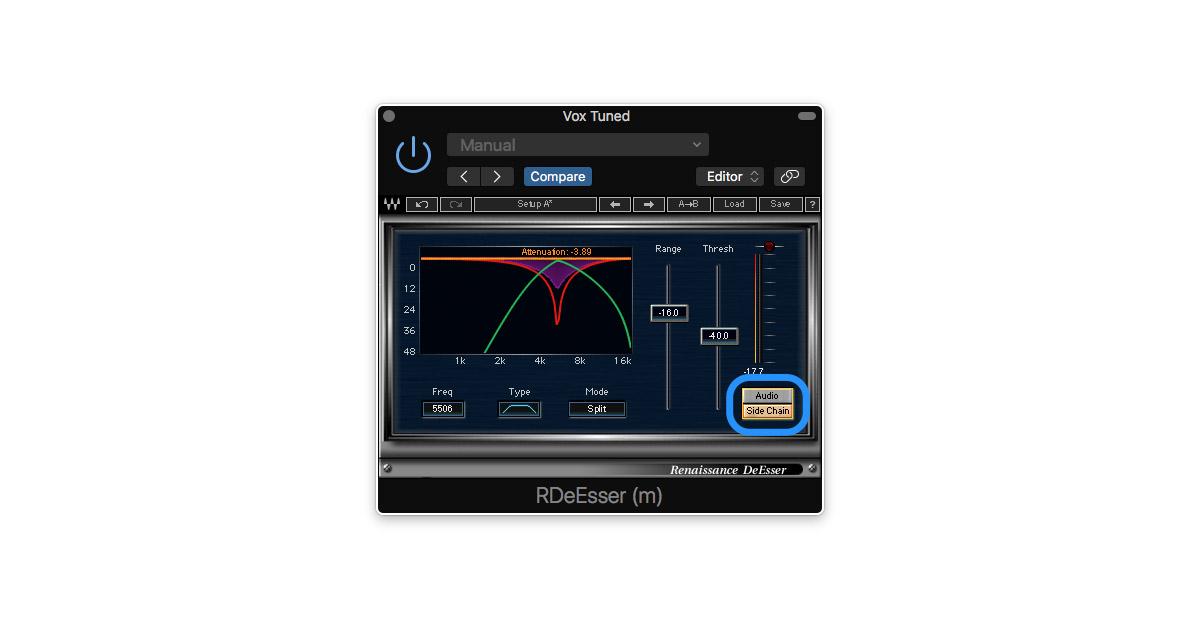
Now set your threshold. You only want the de-esser activating during sibilance. If it’s activating at other times in the song, your threshold is too low.
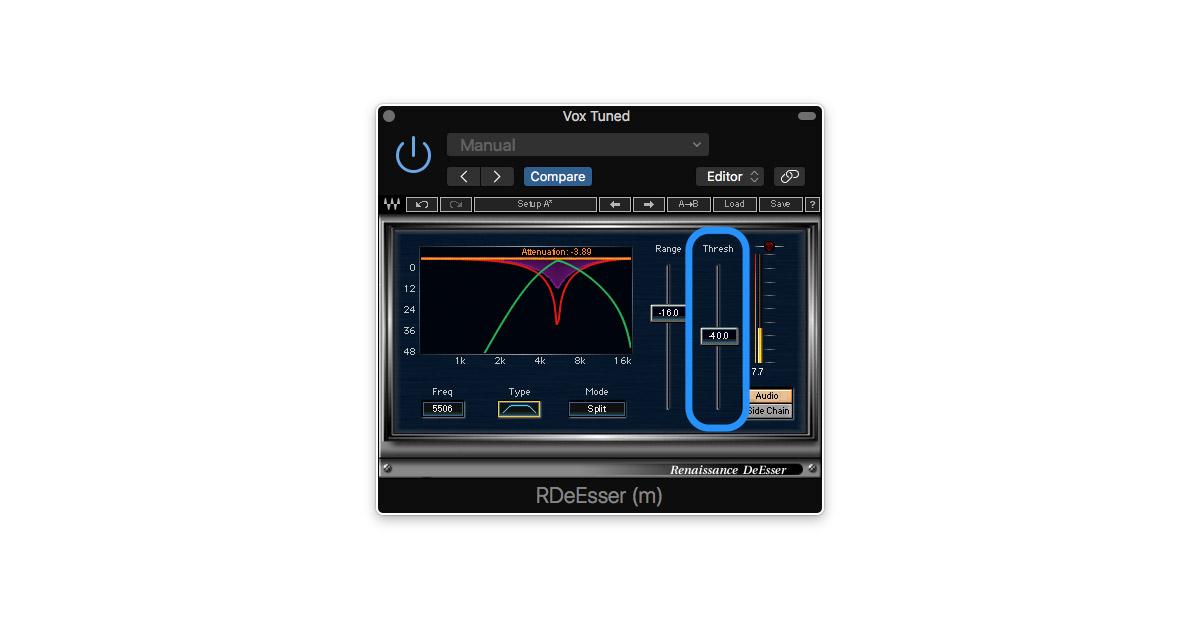
The trick is to get the right threshold. You don’t want it compressing too little, or it’ll do nothing to your sound. You also don’t want it compressing too much, or it’ll sound like the singer has a lisp.
Most DAWs come with a stock de-esser that will get the job done. If you’re in the market for a smoother sound, I’d recommend the Waves Renaissance DeEsser.
It’s affordable, often on sale, and it works like a charm. Once you get that vocal sounding natural, it’s time to move on to your compression.
Step 3: Control your dynamics with serial compression
Vocals are a very dynamic instrument. They go from soft to loud in an instant—sometimes randomly. When you’re trying to create consistency in a song, they tend to stick out.
So you want to use a compressor to control those dynamics and smooth out your vocal. More specifically, you want to use multiple compressors. It’s called serial compression.
Serial compression is a technique where you use 2-3 mild compressors instead of 1 heavy compressor.
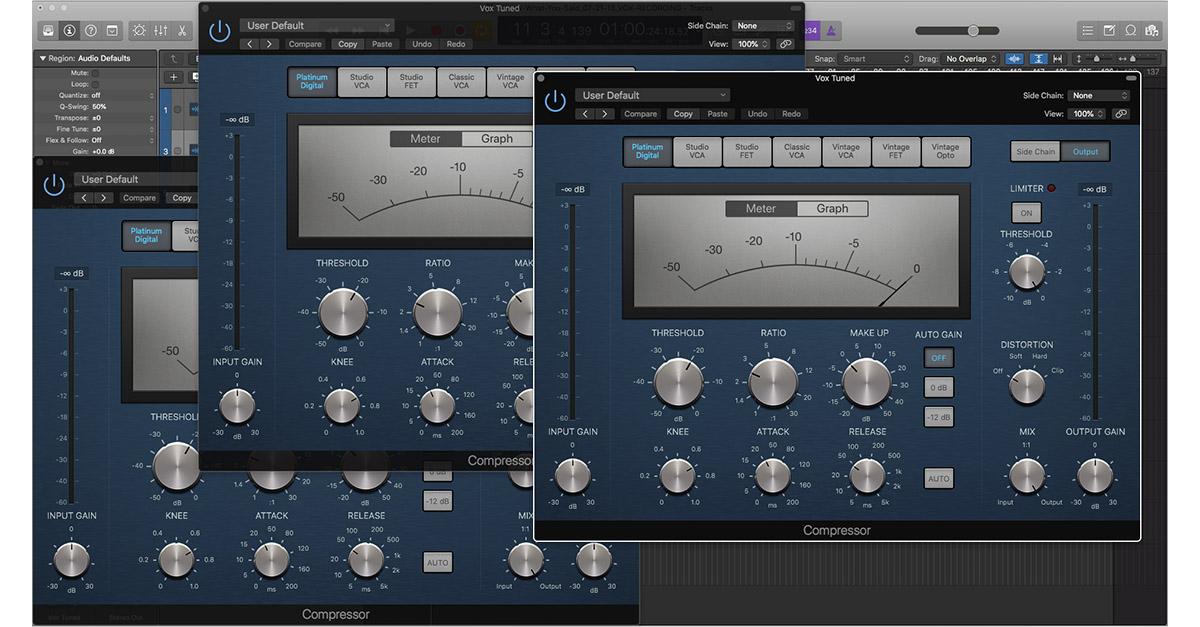
When a compressor is working extra hard, it tends to sound mechanical and unnatural. It sounds like the vocal has been run over with a steam roller.
But with a few light compressors in a row, the vocal sounds controlled yet natural.
It doesn’t sound like it’s been heavily compressed, even if the amount of compression is exactly the same.
To set up your serial compression, follow these steps:
- Load up a compressor. Any will do.
- Next, lower the threshold and raise the ratio to extreme settings. This allows you to clearly hear the compressor working.
- Start with a medium attack time around 15ms and adjust to taste. A fast attack (5ms) will make your vocals sound thick and heavy. A slow attack (30ms) will make your vocals sound punchy and aggressive.
- Dial in a medium release time of 40ms and adjust from there. Try to get the compressor pumping in time with the music.
- Once you’ve settled on an attack and release time, bring the ratio down to somewhere between 1.5:1 and 3:1.
- Adjust the threshold and ratio until you’re averaging 2-3dB of gain reduction (or higher for heavier music).
- Increase your makeup gain so that the track’s volume is the same as before.
- Finally, duplicate the compressor plugin. Check the settings to make sure you’re getting the same amount of gain reduction. If you want more gain reduction, duplicate the plugin again.
Remember, sometimes these settings won’t work throughout the entire song.
If there are parts of your song that are too loud for the compressors, try using gain automation. It’s the secret sauce to a consistent vocal.
Step 4: Shape your tone with another EQ
Now that your vocal is sitting “in the pocket” nicely, it’s time to shape your tone with some tonal EQ.
Tonal EQ is exactly that – EQ that shapes the tone of a track.
Rather than “cleaning” a track like room resonance EQ, tonal EQ lets you tweak the tone to find the sound you’re looking for.
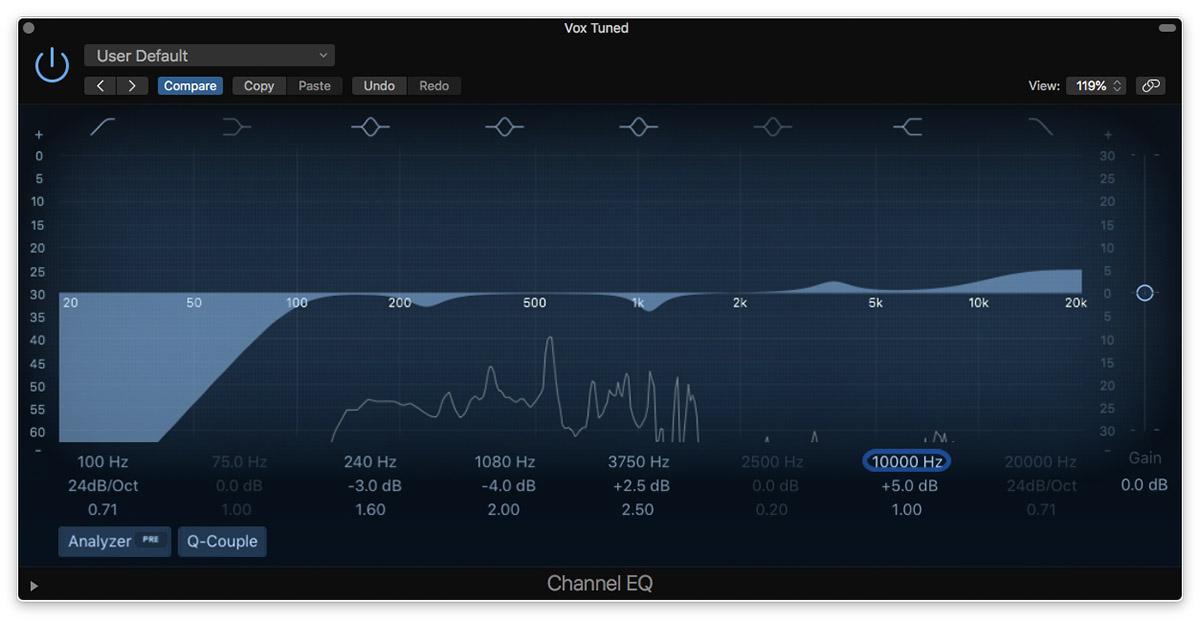
What you do in your tonal EQ is entirely up to you. Each track is different, so it’s difficult to give any universal advice.
No matter what, make sure you’re listening to your reference track. You want to get your vocal to sound as close to your reference as possible.
So if your vocals sound muddier than your reference, you may want to cut some of the low mids.
If your vocals are duller than your reference, you may want to boost somewhere in the upper mids.
If your vocals are darker than your reference, a top end shelf boost may be necessary.
But again, every track is different. There’s no hard rules here. Use your ears and find your flavour.
It’s important to note that you’ll want to make more subtle moves during this part of the process. Usually your boosts and cuts will be between 2-3dB, and no more than 5dB. It’s easy to get carried away on a power trip and wreck your vocal with too much EQ.
Step 5: Add a little space with some reverb or delay
If you recorded your vocals correctly, they should sound too dry in your song. You want your vocals to be the most up-front-and-center element of the song, so recording a vocal in a well-treated room is a big plus.
That said, a bone dry vocal is always going to sound weird.
So you want to add a little space back with some reverb or delay.
Whether you pick reverb or delay to give your vocal some space depends on what sound you’re going for.
Reverb sounds more natural, but it pushes the vocal back farther in the mix.
If you want a super close vocal (think pop or rap), you’re probably not going to use this. But if you’re wanting a more folk or ballad vocal, reverb is perfect.
Delay sounds less natural, but it keeps the vocal close in the mix. It’s pretty common to use a fast delay to create space in more produced genres, like R&B and pop.
Here’s how you create each.
How to create vocal reverb:
To create vocal reverb, start by sending your vocal to an AUX track. Put your best reverb plugin on it.
The process of doing both is different for every DAW, so search “how to create a send in [insert DAW here]” if you’re not sure how this works for your system.
Make sure your reverb is set to “100% wet” to keep any of the direct sound from bleeding through.
Next, time your reverb time to the tempo of the track. To do this, turn the reverb time up to 4 seconds, then slowly move the time down until it sounds good to you.
In general, shorter reverb times work best for avoiding a muddy mix. This usually means a reverb time of less than two seconds.
You want your reverb to fade out before the next phrase. For example: If you solo your vocals in the chorus you would hear the reverb of the first phrase fade away before the next phrase starts up.
This rule of thumb will keep your reverb from making the vocals sound messy and uncontrolled.
Once the reverb time is set, check out the pre-delay. The pre-delay is how much time it takes for the reverb to come in after the vocals have started. Our ears naturally use pre-delay to determine how far away we are from the walls of a room. For a vocal, pre-delay is a perfect way to keep reverb from muddying up the beginnings of words.
Experiment with pre-delay times and see what fits best with the song. Usually somewhere between 30-100ms is good.
Next, set your distance parameter. This determines how close the listener is to the vocalist.
If you want your vocals to be as up-front and personal as possible, try setting the distance very low.
Finally, put an EQ plugin before the reverb to control the tone of the space.
Your vocal reverb sound has a big impact on the sound of the vocals themselves. Often, you can use your reverb to fix issues that you haven’t been able to fix with your vocal processing.
If you have a vocal that’s too dark, for instance, it might be a good idea to cut out the low mids of the reverb and boost the top end. That way you’ll get a nice subtle shimmer without having to boost the top end of the vocal itself.
Also, it’s usually a good idea to cut out the lows of a reverb. That area isn’t useful for vocals – it just muddies up the mix.
Now the reverb is shaped and ready to go. The final step is simple:
Set the level of your reverb:
While playing the song on loop, turn the reverb all the way down.
Then slowly bring it up until you notice it. Once you’ve done that, turn it down just a bit – you usually overestimate how loud it should be.
Your reverb and delay are generally meant to be felt, not heard. The right place isn’t where it’s audible and obvious. The right place is where it makes the vocal “feel right” with the rest of the instruments.
Next, I’ll explain how to setup your vocal delay.
How to set up a vocal delay
For energetic, powerful vocals, try setting up a stereo slapback delay. It’s a trick that pro mixers use to get their vocals up-front but cohesive.
First things first, create an aux track for the stereo delay. You’ll be sending our vocals there to be processed.
Just like the reverb, make sure the delay is set to 100% wet (or, depending on the plugin, that the mix knob is set to 100%).
Next, unlink the sides of your stereo delay. You’ll want to be able to change the delay times of both sides independently.
Set one side to 50-200ms, and the other about 20-50ms behind that. The exact number will depend on how obvious you want the effect to be. The longer the delay, the more obvious it is.
Just turn the delay time up high, then turn it down slowly until it sounds right to your ears.
Next, set the feedback to 0-15% feedback. Traditionally, this has NO feedback, which means it has only a single repetition. However, having a few extra delays will help the effect to sound more natural.
Now you’re going to do the same thing as we did with our vocal reverb—shape the tone with our EQ. Don’t treat this exactly like your reverb though.
Slapback delays usually have filters on the low and high end to make the delay “fit inside the vocal.”
I’ll usually cut up to 300Hz and down to 3kHz at the most. Make sure to use your ears—only cut as far as you feel the song needs! Don’t cut just for the sake of it.
Finally, you just have to mix the delay in!
The process is the same as your vocal reverb. While playing the song on loop, turn the delay all the way down. Then slowly bring it up until it feels right to you. Then turn it down just a bit.
That’s it! Your vocals are almost done. Only one more step…
Step 6: Add some flavor with effects
Vocal effects are great for giving your vocal some character. And there’s so many different effects to choose from.
Here’s a few suggestions to get you started:
- Add some chorus to a send. This does a great job of spreading the vocal out in the stereo field.
- Add some flanger as well. This will give your vocal that “lazer” sound you hear in many 70’s and 80’s records.
- Use a pitch shifter to introduce a little bit of a higher or lower octave. This is a great way to subtly thicken up your vocal, as well as making it warmer or brighter.
- Double your vocal. This is something you’d need to do in the recording stage, but it’s a great effect to give your vocals a thick, “group” sound.
- Run your vocal through a guitar amp simulator to add some extreme grittiness. This is great for bluesy, aggressive genres.
There’s a thousand options you can choose from… Experiment with everything you can think of to create your own unique vocal sound!
Mix your vocals right
If you follow these steps, you’ll end up with an amazing sounding vocal.
The more you practice, the better results you’ll get. Eventually, you’ll be putting out vocal sounds that rival the stuff you hear on the radio.
Keep on working and you’ll get amazing results!
Just remember these steps:
- Get rid of any room resonances with an EQ
- Tame your sibilance with a de-esser
- Control your dynamics with serial compression
- Shape your tone with another EQ
- Add a little space with some reverb or delay
- Add some flavor with effects
Good luck!
The post Mixing Vocals 101: 6 Steps to Get Release-Ready Sound appeared first on LANDR Blog.