You finished recording and mixing the songs on your album—Congratulations!
Of course albums aren’t just a group of songs… They need consistency.
Which is why LANDR now offers album mastering—to give you not just better sound, but consistent sound as well.
Before you upload your masterpiece for mastering, there’s 6 simple steps you need to take to get the best results.
Each song included on your album or EP needs to be prepared for mastering.
1. Prepare your tracks
The same guidelines for preparing your music for mastering apply to album mastering as well.
Each song included on your album or EP needs to be prepared for mastering.
If you’re not sure if the tracks on your album are ready for mastering, read our guides on How to Prepare Your Tracks for LANDR Mastering and Headroom before moving on to mastering your album.
2. Pick the order of your songs
Choose the order of your tracks before you master. It will help you figure out how much silence you’ll need between each track to make your album flow well.
Remember, LANDR doesn’t add silence in between your tracks. That part is up to you. So pick your track order and insert the correct silences before the album mastering step.
If you change your track order later, the transition between tracks might happen too fast or too slowly. So get it right and commit early.
After you choose the tracks for your album from your LANDR library, re-order them before you master.
Remember, LANDR doesn’t add silence in between your tracks. That part is up to you. So pick your track order and insert the correct silences before the album mastering step.
This way your album will play in the correct order in the album view section of your LANDR library when you’re done mastering.
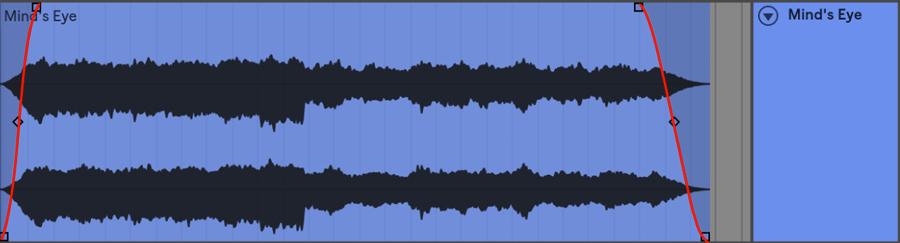
3. Choose your fade-ins and fade-outs
Fade-ins help avoid unwanted noise and audio clicks that may occur before the music starts.
Fade-outs create smooth endings and help you avoid unwanted noise that may occur when the music stops.
Make sure you have your fades correct before LANDR mastering. There is no right or wrong fade times. What works best for your tracks is up to you.
Remember: Your fade times will depend on your track order, so make sure you consider the order of your songs when picking the times.
4. Insert silence at the beginning of your tracks
To avoid abrupt track starts or audio being chopped of when playing back, always leave a small amount silence before any audio starts.
We recommend leaving at least 100-200 ms at the beginning of each track. However, leave more silence if you feel like the track starts too quickly.
Silence at the start of your tracks should be added in addition to your fade-ins mentioned above.
LANDR album mastering will not add silence at the start of your tracks. So silences should be added in your DAW prior to bouncing your files for mastering.
Preview your unmastered album before any mastering occurs to make sure you like the pacing and your audio is glitch free.
5. Insert silence at the end of your tracks
The amount of silence you leave at the end of each track creates the gaps that make your album flow smoothly.
We recommend leaving at least 2 seconds of silence at the end of each track (after your fade-outs), but how long your silences are will depend on your track order and your desired flow between tracks.
Silence at the end of your tracks should be added in addition to your fade-outs mentioned above.
LANDR album mastering will not add silence at the end of your tracks. So silence should be added in your DAW prior to bouncing your files for mastering.
6. Listen to your album before mastering

Preview your unmastered album before any mastering occurs to make sure you like the pacing and your audio is glitch free.
All those songs aren’t just tracks anymore, they’re a masterpiece in the making.
Use a new DAW session and line up all your tracks in a row, or simply create a quick playlist to hear your whole album in your desired order.
Listen to the WHOLE thing.
It might be hard after working on the same tracks for so long, but listening to your entire album start to finish before mastering will save you headaches later on.
So take the time to review your entire project.
Finish albums faster
Perfect, you’ve prepared your mixes for mastering, picked your track order, added silences and fades and listened to your entire project. You’re ready.
All those songs aren’t just tracks anymore, they’re a masterpiece in the making.
Enjoy the feeling of hearing consistent mastered sound across your whole project, and take a second to congratulate yourself on being done right—finishing your album is a big deal!
The post How to Prepare Your Album for LANDR Mastering appeared first on LANDR Blog.