Compression is one of your most powerful mixing tools. It’s the essential element behind every good mix.
But to make your compressors work, you need to understand compression first.
It’s intimidating to start learning such a huge subject, especially when the controls and their effect on your signal are difficult to understand depending on your sound.
This article will help you learn what compression does, how to choose the perfect compressor settings, and some common mistakes to avoid.
But first…
What is compression in music?
Compression in music is the process of reducing a signal’s dynamic range. Dynamic range is the difference between the loudest and quietest parts of an audio signal.
You need to reduce the dynamic range of most audio signals for them to sound natural on a recording.
For example: Imagine a whisper and a scream on the same audio track. If they were the same difference in loudness as they are in real life, it would be very distracting!
Compressors fix it by attenuating the loudest parts of your signal and boosting the result so the quieter parts are more apparent.
Imagine a whisper and a scream on the same audio track. If they were the same difference in loudness as they are in real life, it would be very distracting!
Using compression
Experienced engineers will often talk about how one compressor is more “musical” than another.
It’s an important concept. Your dynamics are one of the most fundamental aspects for making your sound unique.
When you use a compressor to change those dynamics, the mix engineer becomes part of the musical performance.
If your compressors are working properly, they’ll contribute positively to the performance and make a good recording great.
Transients: understanding your high-energy moments
To understand compression, you need to know what transients are.
Transients are the initial high-energy moments of a certain sound in your waveform. These bursts give our brains a lot of information about the quality of a sound.
Since transients are often louder than the rest of your waveform, compressors will affect them considerably.
For example: Think of a nice cracking snare. As the snare hits, there’s an initial peak in your waveform that slowly tapers off. That initial peak energy is your transient.
![]()
Compression helps you find the perfect balance for a track that has good dynamic range with a nice, full body.
A waveform with good dynamics will have many transients as certain sounds hit and then decay in your composition. Transients, and their eventual decay, are what make a waveform look like a fishbone.
There is such a thing as a track that’s too dynamic. If your song is all transients with no body, your sound isn’t gonna be interesting to the ear.
The opposite is true too, no dynamics can lead to a lifeless and fatiguing sound, and a waveform that looks like a big brick.
Compression helps you find the perfect balance for a track that has good dynamic range with a nice, full body.
The best compression settings for your mix
First off: A good rule of thumb for compression is ‘do no harm.’
Remember those transients you just learned about? Your compression should preserve the character of them, not destroy it. Good mixes need ups and downs in energy in order to be pleasing to the listener’s ear.
Even if you’re using a very coloured compressor or applying intense compression for effect, your goal should be to enhance the natural and musical dynamics of your signal—not destroy them.
Even if you’re using a very coloured compressor or applying intense compression for effect, your goal should be to enhance the natural and musical dynamics of your signal—not destroy them.
When you’re searching for the right compression settings, actively listen for changes in dynamics as opposed to shifts in timbre.
As you experiment with the settings, ask yourself:
- What am I trying to achieve with my compression? Is it a corrective or aesthetic change?
- What parts of my signal are becoming more apparently loud?
- What’s happening to my transients and dynamic range?
- Is it obvious where the gain reduction is occurring?
- Am I pushing it too far?
To answer these questions and more, let’s take a look at the parameters almost every compressor has, and what you need to know to set them properly.
Threshold
Your threshold sets the signal level where your compressor will start working. Threshold is measured in dB, so any signal above your threshold dB will be compressed.
When you set your threshold, you’re deciding which part of your signal you want to reduce.
Setting the threshold lower will apply the compressor’s gain reduction to a greater portion of your signal. Setting it higher will affect only the most aggressive peaks and leave the rest untouched.

To set the perfect threshold, think about what you’re trying to accomplish by compressing your audio, and which parts of the signal are the most problematic.
Are the signal’s loud transients distracting from the rest of your mix? Or maybe your trailing decay is inaudible in the mix?
A good rule of thumb for compression is ‘do no harm.’
Set your threshold so you’re hearing the compressor work on the part of the signal you need to address and no lower.
The perfect threshold setting will depend on your needs. Play your track back and adjust on the fly to find the perfect amount.
Ratio
Ratio determines how much gain reduction your compressor applies when the signal goes above your threshold. It’s called the ratio because it’s expressed in comparison to the unaffected signal.
The higher the first number of the ratio, the greater the factor by which the gain is reduced.
For example, we can say that an uncompressed signal would have a ratio of 1:1 and a brickwall limiter (which allows no signal whatsoever to go above the threshold) would have a ratio of ∞:1.
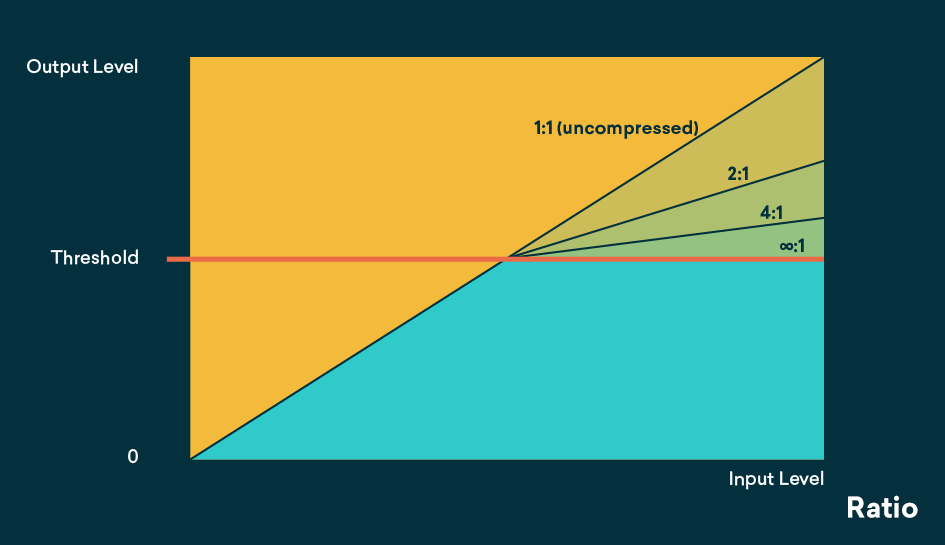
Settings between 1.5:1 and 10:1 are the most common.
A lower first number in your ratio will give you gentle compression you might apply to an entire mix, while a higher first number will give you an intense squashing effect.
With the threshold set to affect the range you need, listen to how increasing the ratio changes the source material to find the best ratio.
As you increase the ratio, listen carefully for when the gain reduction effect becomes apparent. Stop just before it becomes obvious and begins to negatively impact the sound.
Attack and Release
Your Attack and Release are two parts of the same range of control—the timing with which the compressor’s gain reduction starts (attack) and stops (release) acting on your signal.
You already know that when the signal goes above your threshold, the compressor will begin to reduce the gain based on your the ratio you set.

But how your signal gets reduced is determined by the attack and release controls.

Attack and Release define whether the compressor reaches its full range of gain reduction right away or more gradually.
Together, they are the most crucial settings for achieving natural, musical sounding compression. Set the attack too fast and your transients will be crushed. Set the release too fast and you risk an unnatural pumping effect.
Make sure you have a strong idea of which elements of the sound you want to remain dynamic, and set your times to achieve it. Good compression starts with a good plan of what sounds need what type of processing.

Hot Tip: Use a compressors VU meter to watch how the needle moves. Is it moving in time with the music? If so, you’re probably getting close to the right attack/release times.
There are other settings for controlling compression that I won’t get into here. But with a strong understanding of these 4 settings, you’ll have a solid base to achieve healthy compression.
Common compression mistakes
One of the most glaring signs that a track has been mixed by an inexperienced engineer is the improper use of compression.
Here are a few mistakes to avoid as you explore and experiment with your compressor settings.
1. Attack set too fast on drums/percussion
You might be tempted to stylishly slam the percussive elements of your mix with your favourite compressor. But you really can have too much of a good thing.
If the attack time is set too fast, you’ll simply be reducing the “impact” of the individual drum hits by squeezing the initial moments of the sounds too hard.
Percussion hits are meant to be dynamic, so let them!
It’s easy to think faster attack settings sound better when the drums are soloed, but in the context of the track, the drums will disappear if the the transients have been limited too aggressively.
Percussion hits are meant to be dynamic, so let them!
2. Certain attack and release times cause low frequencies to distort
This can be more of a factor with hardware compressors, but plugins—especially those that faithfully model analog gear—are susceptible as well.
For example: Say you’re trying to tame the unruly attacks of a bass guitar played with a pick. You want to set the attack time of your compressor as fast as possible to deal with the transients, but you notice that when you do, an unpleasant distortion occurs.
This happens because the period of a low frequency wave is actually quite long. If the compressor’s attack time is set fast enough, the gain reduction can begin acting within one cycle of the sound wave. This effectively clips the waveform and produces an audible distortion.
There are two ways to get around this:
The first is to put a hi-pass filter in the compressor’s sidechain so that it’s detector is only “listening” to the high frequencies.
If you’re using a compressor plugin, the other option is to use the lookahead function.
This function sets the compressor to respond a few milliseconds before the transient actually occurs, which allows enough time for the lengthy low frequency waves to pass through without distortion.
Pro Tip: You can do this with hardware as well by duplicating the track in your DAW, nudging it a few samples earlier on the timeline and sending it to the compressor’s sidechain input while the original track is sent to its normal input.
3. You assume every compressor is the same
This is more of a personal admission, but it’s worth remembering that not every compressor works exactly the same way.
For example, the 1176 FET Compressor is one of the most essential compression sounds in music, and I was incredibly excited to get my hands on a good software emulation.
Every compressor doesn’t work exactly the same way.
I started using it right away but it took me an excruciating six months before I realized that the attack and release knobs are actually reversed (with slower times fully counterclockwise and faster times fully clockwise) due to the design of the analog hardware.
If you start using a new process or plugin, take care to read up on exactly how it works and use it with confidence.
The Perfect Squash
Understanding your tools is essential for your mixes to sound polished and professional. Compression might just be the biggest one, so make sure you’re getting right.
As you get more and more used to listening for what compressors do to your recordings, start exploring other compressors and how they’re useful to your sessions. Soon you’ll be obsessed and drooling over the vintage classics.
Now you know the ins and outs of every knob on your compressor. So get back to your mix and squash something just right!